Gideros Mobile Tutorial 1: Installation and interface

Install Gideros Mobile

This is fairly simple: go to Gideros Mobile website and download SDK then run setup. It’s just few “Next” clicks. After you are done it is best to go to their registration form and register for free. This way you will be able to export and build your Android (you can’t export IOS apps on Windows due to Apple not allowing to install their SDK if I am not mistaken) apps with File->Export Project in Gideros Mobile Studio (GMS).

Pin the GMS to your taskbar and run it. Here is the explanation of most important parts of GMS (click on the photo to see it in full size):

gideros

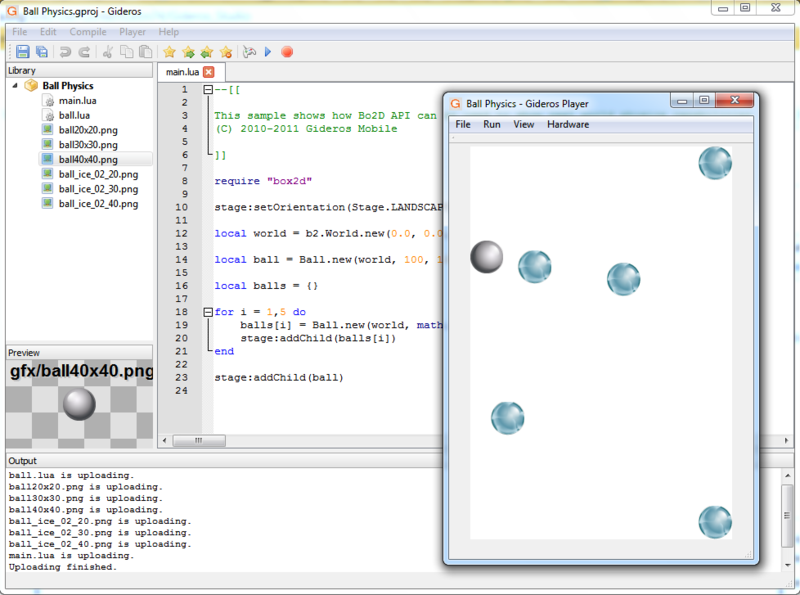
Library: This is the list of your Project files  – .lua files, graphics, sounds and so on
Preview:  When you click on image in your Library you will see it displayed here
Editor: This is where you edit code (.lua) files. Double click on file in Library to open it.
Gideros Player: Your program will run in this window. This is how your app will look on smartphone.
Output: Console window. You will see all text sent to console here,also upload progress, errors..

Everything is self evident, I will only explain how to start the player. When we save the project we wan’t to see how it will look on our mobile. What we need to do is click Player->Start Local Player in menu and the Player will start. You will see the date and IP displayed.  After “Gideros Player” opens, the start and stop icons will become enabled:

gideros_player_start_stop

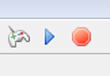
You can now press play and stop totest your game or app in this player. You can also zoom the player, rotate it, set framerate etc. All these options are found on Gideros Player window.

How to test you app instantly on your smartphone

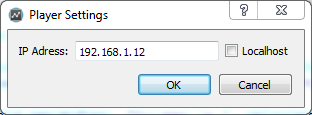
One of the best things about GMS is that you can instantly run your project  on your smartphone via wi-fi. To run project on Android device you need to install the GiderosAndroidPlayer.apk (comes with the installation) on your device. Start the installed app and it will display IP of your device. Open Player->Player Settings and uncheck the localhost option (use localhost to use player on your computer). Now add the IP  that you see on your smartphone and click OK. In my case it was 192.168.1.12 but it will be most probably different on your smartphone.

player-settings

If everything is ok then when you press play you will be able to see your game running on your smartphone! You can edit and save the code then press play again and your game will instantly be updated on your smartphone. How cool is that? 🙂

In the next lesson we will create first “Hello World” program.

Gideros Mobile Tutorial : Mobile Game Development

Why am I learning Mobile Game Development?

I always enjoyed making games on C64 and Amiga (AMOS Professional was great!) when I was a kid. Platformers and turn-based RPG games. It is now different time and smartphone games are all the rage. I always wanted to try making some simple mobile game but the first problem was that I am a busy web developer (Codeigniter then Laravel ..) so I don’t have much time for this. The biggest turn off for me was that you have to learn Java or Objective-C to develop for Android or IOS. Yes, it is not hard but somehow I don’t like to learn these languages (and I don0t have MAC). I tried hybrid app development (phonegap,intel xdk..) for a while but using HTM5/CSS somehow just didn’t feel right, especially for gaming. Maybe one day we will get there for now it just can’t compete with native games.  So I always ended up giving up on mobile development….. until I discovered there is a “3rd” way! (Yes, I am new to this 😛 )

Mobile Game Development with Gideros / Lua

Somehow I found Corona SDK (I decided to not use it after reading some forums), Moai, Monkey but finally I decided to use Gideros. I couldn’t believe that you can make fast, almost native speed apps with a language that is not Java or Obj-C! I never used Lua so I am still learning it but somehow it just feels right. So far I am loving Gideros! It is simple, it is free, it has in-built editor and a lot of plugins to get you started. Sure, it is not for the most complicated 3D games but for simple games it is great! One of the best things for me is that you simply install their app on your smartphone and you can test you apps literally instantly over wi-fi! Modify some code, save,  click play and you app will play on your smartphone/tablet!

What do I need to start with Gideros Mobile Game Development?

First, download Gideros for your OS. I will use Windows version.  Second, you should try to get familiar with Lua scripting language.

What kind of tutorial will this be?

I am just a beginner in mobile development, Lua and Gideros so this is not for well versed mobile dev coders. I am making these tutorials so I can come back if I forget things and to write down my progress so in a way you can learn with me. I gave myself a 30 day challenge to see how it goes.  I will start with installation and then with basics.

First part is coming tomorrow, stay tuned.

PS: My main focus is of course still web development with Laravel so I will continue posting Laravel articles.  The blog is not turning itno mobile dev blog. This is just a side “project”,  a learning experience I want to share 🙂

How to check Laravel version?

Every now and then you would like to check what version of Laravel do you have installed. How to determine that? Here are a couple of ways. I tested this for Laravel 4.

1. The easiest way is to simply run artisan command php artisan --version from your CLI and it will return your Laravel version:

check laravel version

2. You can also browse to and open file vendor\laravel\framework\src\Illuminate\Foundation\Application.php. You will see the version of your Laravel instalation near the top of the class, defined as a constant:

/**
	 * The Laravel framework version.
	 *
	 * @var string
	 */
	const VERSION = '4.0.10';

3. You can also place a little code in your routes.php file at the end and then access it like yourdomain.com/laravel-version . This of course assumes that there is nothing in your routes.php file that would not allow the access of /laravel-version route.

Route::get('laravel-version', function()
{
$laravel = app();
return "Your Laravel version is ".$laravel::VERSION;
});

Please keep in mind that it is best not to keep this code on your production server. It’s not that it is harmful but there is simply no need for this because the first two methods that I showed you are simpler. If you still want to keep it then maybe you can comment it out.

There are other ways, especially with code but why complicate things when these 3 are the easiest? 🙂

If you know some simpler ways then please let me know in the comments.

Laravel 4 with Twitter Bootstrap

One of the first thing many, including me, want to do after installing Laravel 4 is to add Twitter Bootstrap. If you go searching for this on Google you will get all kids of results that may confuse beginner. “Use Bower”, “Install it as a external package then use Basset” and several more. I think some are a little too complicated for a beginner and it doesn’t need to be. I know adding a line to composer.json is easy but this will usually (depending on whcih package you chose) download gazillion of files to your vendor folder.

Here is what to do for a simple website – you don’t need to treat it as a external package that needs to be added via composer, bower or be used with help of Basset etc. Sure, it’s easier to update it via composer but it is not that difficult to update it manually too – if you indeed need an update.

So here are few easy ways:

Use Bootstrap CDN links

Simply include 3 links, which will fetch your twitter bootstrap files from MaxCDN site. This is the easiest and fastest way. Let’s assume that you have a master blade template called default.blade.php. Place this code inside your HTML head section (anywhere):

<head>

<!-- Latest compiled and minified CSS -->
<link rel="stylesheet" href="//netdna.bootstrapcdn.com/bootstrap/3.0.3/css/bootstrap.min.css">

<!-- Optional theme -->
<link rel="stylesheet" href="//netdna.bootstrapcdn.com/bootstrap/3.0.3/css/bootstrap-theme.min.css">

<!-- Latest compiled and minified JavaScript -->
<script src="//netdna.bootstrapcdn.com/bootstrap/3.0.3/js/bootstrap.min.js"></script>

</head>

That’s it, you should now be able to use Twitter Bootstrap goodness.

Download Bootstrap and put it in your public folder

I like to host my own files and not depend on third party so I usually do this. Here we don’t treat Twitter Bootstrap as a Laravel package.We will bypass Composer so we manually put Twitter Bootstrap files into our public assets folder.

Go to getbootstrap.com, download Twitter Bootstrap ZIP file and extract the content of ZIP file (pull entire dist folder) to your /public/ folder. I usually rename dist folder to tb.

You will then end up with css,fonts and js folders inside /public/tb/ folder.

Now we follow the same procedure like before except that we will link to local files we just downloaded. I will use Laravel’s HTML helper to create links. {{ and }} is a Laravel Blade syntax.

<head>

{{ HTML::style('tb/css/bootstrap.css') }}
{{ HTML::style('tb/css/bootstrap-theme.min.css') }}
{{ HTML::script('tb/js/bootstrap.min.js') }}

</head>

As you can guess the first two lines will create CSS style links and the third one will create script link. If you view the source of generated page you will see that Laravel’s HTML helper created something like this (of course http://yoursite.dev will be replaced by your site) :

<head>

<link media="all" type="text/css" rel="stylesheet" href="http://yoursite.dev/tb/css/bootstrap.css">
<link media="all" type="text/css" rel="stylesheet" href="http://yoursite.dev/tb/css/bootstrap-theme.min.css">
<script src="http://yoursite.dev/tb/js/bootstrap.min.js"></script>

</head>

There are other ways (Bower, Composer, Basset…), which I might show in another post (or maybe I’ll update this post later) but these two are the easiest, especially for those just starting with Laravel 4.

Enjoy your Twitter Bootstrap powered Laravel 4 website 🙂

How to pin shortcut or a batch file to Windows 7 Taskbar?

I installed (in this case just extracted files to some folder) great Windows console replacement caled Cmder. When you want to run it you click on Cmder.bat file. I added it to my PATH system variable but I also wanted to pin it on my taskbar. I was quite surprised when I kept dragging the icon to my taskbar and Windows 7 didn’t offer me “Pin to taskbar” option! What gives?

Apparently you can’t pin shortcuts or a batch file to the new Windows 7 Taskbar.

So here is a quick workaround. Let say you extracted it to the folder C:\cmder\Cmder.bat

  1. Open the folder, right click on Cmder.bat file and select “Create shortcut”.
  2. Right click on newly created shortcut and select properties.
  3. Target: input box will contain this text: C:\cmder\Cmder.bat. Replace it with C:\Windows\System32\cmd.exe /C "C:\cmder\Cmder.bat". Don’t forget the quotes.

Save it and now you can drag it to your taskbar 🙂

Again, my Cmder is in C:\cmder\Cmder.bat folder. If you put yours in different folder you have to use your folder in step 3.

Commands out of sync; you can’t run this command now

Sometimes the solutions to what seems to be complex problems are easy and often something completely unrelated.

I woke up to one of my websites not working although I did not touch the code for weeks. First thing that I got was Firefox telling me this :

The page isn’t redirecting properly

Firefox has detected that the server is redirecting the request for this address in a way that will never complete

After ruling out .htaccess and other problems I came to conclusion that it has something to do with a database querying.

So I went to phpmyadmin and tried to manually run the query. To my surprise I got another problem:

Commands out of sync; you can’t run this command now

Great, so suddenly the nested MySQL command I have been using for years stopped working. If you Google for this you will get tons of sites telling you that MySQL has problem with stored procedures (I’m not even using them), that we need to switch to mysqli or PDO extensions, that we are calling client functions in the wrong order etc. However this did not explain why did my code suddenly stop working despite me not touching anything. Maybe database got too large?

To troubleshoot this I wanted to make a copy of a specific table in question and lo and behold – when I copied it via phpmyadmin I got error saying something like “This table is corrupt so it cant be copied”. I checked the table and there it was – a corrupt table! I ran a repair table command, refreshed a site and voila, it worked!

So as you can see the solution was something completely unrelated to error messages and what most websites suggested it was. That does not mean that most people with this errors have the same problem like I did. But it is a reminder that sometimes we should try a simple solutions like checking if database or table became corrupt before spending few hours into troubleshooting something that is working fine anyway 🙂

.

Midnight Commander Garbled

If you log in to your Linux server via Putty SSH and start Midnight Commander (MC) you might get garbled lines like this:

midnight commander garbled

The problem is not with Linux or MC but with Putty using “incorrect” character set. So what you need to do is click on the top-left corner of Putty window (just left of word “mc” and that horrible black smudge I made to hide my server name)  and when menu appear select Change Settings and then navigate to Window -> Translation and change Remote character set to UTF-8 :

putty config

Click Apply, restart Midnight Commander and it will now look much better with proper border lines:

midnight commander

That’s it. If you still have problems then open Putty Reconfiguration window again, navigate to Window->Appearance and try changing the font used in terminal window. I use Courier New.


Create a WiFi hotspot in Windows 7 and share Internet connection

If you don’t have WiFi router you can still share your internet connection via your PC. I was using connectify.me software and it did the job but it felt bulky,it disconnected at random times (free version) and my laptop fan was on full speed all the time,which was slowing down my PC. I was very surprised when I learned how easy it is to do it by yourself (on windows 7 at least). All you need to do is enter few commands and enable ICS and that’s it! What is great is that you can use this connection with your Nexus 7 or any other smartphone.

1. Click Start and type cmd, then right click cmd.exe and select “run as Administrator”:
cmd run as administrator

2. Run this command (I used “My net” as SSID and “elcoderino” as pass so replace it with your values)

netsh wlan set hostednetwork mode=allow "ssid=My net" "key=elcoderino" keyUsage=persistent

This will create “Microsoft Virtual WiFi Miniport adapter” and will also set up your hostednetwork. Now you need to enable Internet Connection Sharing (ICS) or Network Bridging for this new adapter (don’t worry, it is just few clicks. I enabled ICS connection but you can also bridge networks)

3. Now you simply start or stop new hosted network with these commands (please keep in mind that cmd.exe needs to be “run as administrator” – check step 1)

// to start hostednetwork type
netsh wlan start hostednetwork
// to stop hostednetwork type
netsh wlan stop hostednetwork 

and that’s it! You should now have a working WiFi hotspot! Try connecting with your smartphone or tablet. Why install or even pay for the software when you can have it with few simple steps?

Use Composer to install packages not on Packagist

Packagist and Composer are a great combination for installing the packages that we need for our projects (in my case for Laravel 4 project). For example you want to use Sentry 2 so you simply add "cartalyst/sentry": "2.0.*" as required package in your composer.json file. But what if we need a package that is not on Packagist? There are several ways but I will show you two solutions (and maybe add others later).

Installing package that has no composer.json file

In my case I wanted to add Jquery.Gantt package to my Laravel 4 project. This package is not listed on Packagist and doesn’t have its own composer.json file so you can’t just add "Jquery.Gantt": "1.0.*" under "require": in your composer.json file.

What we need to do is add some code to our composer.json file to tell Composer something about the new package,where to find it etc.

Just so you can imagine how this looks when it is all done, here is my entire composer.json file for one of my projects.Keep in mind that you only have to add what is highlighted in grey (lines 2-19 and line 26) to your composer.json file and not everything. The rest of the code is for my project and is included only so you can see where to put your code. Don’t forget to backup the original composer.json before doing this 🙂

  {
    "repositories": [
        {
            "type": "package",
            "package": {
                "name": "taitems/jQuery.Gantt",
                "version": "1.0",
                "dist": {
                    "url": "https://github.com/taitems/jQuery.Gantt/archive/master.zip",
                    "type": "zip"
                },
                "source": {
                    "url": "https://github.com/taitems/jQuery.Gantt.git",
                    "type": "git",
                    "reference": "dev-master"
                }
            }
        }
    ],
	"require": {
		"laravel/framework": "4.0.*",
		"cartalyst/sentry": "2.0.*",  
		"jasonlewis/expressive-date": "1.*",
		"opauth/opauth": "*",
		"opauth/facebook": "*",  
		"taitems/jQuery.Gantt": "1.0",  
		"way/generators": "dev-master"
	},
	"autoload": {
		"classmap": [
			"app/commands",
			"app/controllers",
			"app/models",
			"app/database/migrations",
			"app/database/seeds",
			"app/tests/TestCase.php"
		]
	},
	"scripts": {
		"post-update-cmd": "php artisan optimize"
	},
	"minimum-stability": "dev"
}

Lines 2-19: You have to change few things of course, depending on what package you are installing. Copy the Name from GitHub page (I took mine from https://github.com/taitems/jQuery.Gantt)). You can find both ZIP and .git URLs on GitHub page of that package. Version should be the package version number you want to use – if you are not sure then try * sign.

Line 26: You add this just like you would normaly add every dependency/package that is listed on Packagist.

That’s it. Just run php composer.phar update and your new package will be installed into /vendor/ folder, just like every other package/dependency.

Installing package that is not on Packagist but has composer.json file

I have not tried this yet but in case the package has composer.json file you can just use this code:

"repositories": [
    {
        "type": "vcs",
        "url": "https://github.com/taitems/jQuery.Gantt"
    }
]

It’s the same as in first example – you start from line 2, after the opening {. Do we are using VCS repository instead of the package repository. Composer will use the GitHub API to fetch the branch names and check if the version dev-soft-deleteable-products-disabled exists. If it does, it will clone the repository and check out said branch.

Again, run php composer.phar update and your new package should be installed into /vendor/ folder, just like every other package/dependency.

Note: VCS example will not work on the jQuery.Gantt package because this package has no composer.json file so you have to use the first method. VCS example is here only to demonstrate what to do when the package has composer.json file included.

Share localhost over the internet with ngrok

One of the more annoying things when developing on your local computer is that your clients or friends can’t see what you develop. You can upload it on your web server or you can work directly on the web server but that is inconvenient and slow. So I was very happy to discover this great tool called ngrok. There are similar tools (localtunnel etc) but this one is really easy to use.

Who is your daddy and..no..wait..what is ngrok and what does it do?

Ngrok is a cool little program that creates a tunnel from the public internet (http://subdomain.ngrok.com) to a port on your local machine. You can give this URL to anyone to allow them to try out a web site you’re developing without doing any deployment. Of course your local server has to run at the time of sharing but that is not a problem – you just leave your PC on.

How do I run this ngrok?

With ngrok it is super simple to expose a local web server to the internet. On Windows you just download ngrok.exe, unzip it some folder and then in command prompt (cmd) you just tell ngrok which port your web server is running on.

This is the most simple way (This opens port 8080 on your local machine to the internet). Type this in your command prompt:

ngrok 8080

You will see something like this :

Tunnel Status                 online
Version                       0.11/0.8
Protocol                      http
Forwarding                    http://345355bc.ngrok.com -> 127.0.0.1:8080
Web Interface                 http://localhost:4040
# Conn                        0
Avg Conn Time                 0.00ms

Of course the port (in this case 8080) has to be the port that your localhost is running on. Now just give the generated URL (in our example http://345355bc.ngrok.com) to your client or friend and let them test out your application.

You can do a lot more with ngrok, like inspecting your traffic, XML/JSON syntax checking, replaying requests, requiring passwords to access your tunnels, accessing your tunnels over HTTPS, forwarding non-HTTP services, forwarding to non-local services and more.

Check out ngrok here.