I tried running npm run dev in Windows PowerShell and got this error:
npm : File C:\Program Files\nodejs\npm.ps1 cannot be loaded because running scripts is disabled on this system.
For more information, see about_Execution_Policies at https:/go.microsoft.com/fwlink/?LinkID=135170.
At line:1 char:1
Of course when I went to that Microsoft link there was tons of info and who has time to read all this? There is an easy fix for this. This is not just for npm run dev, you can get this error for most of all scripts.
Why This Happens
Windows PowerShell has security restrictions to prevent malicious scripts from executing. Since npm uses scripts, PowerShell may block it unless you change the execution policy.
Permanent Fix (Recommended)
If you want to allow npm and other local scripts to run without issues, you can adjust the execution policy.
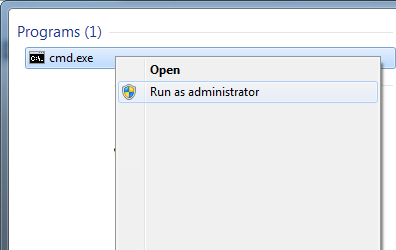
- Open PowerShell as Administrator.
- Run the following command:
Set-ExecutionPolicy RemoteSigned -Scope CurrentUser- Type
Yto confirm.
This allows scripts you create locally to run, while still blocking unsigned scripts from the internet.
Temporary Fix (One-Time Bypass)
If you don’t want to change your system’s settings permanently, you can bypass the restriction just for the current session.
- Open PowerShell.
- Run:
powershell -ExecutionPolicy Bypass- In that session, run your command:
npm run devOnce you close that PowerShell window, the execution policy returns to normal.
Which Option Should You Choose?
- Use the permanent fix if you work with Node.js or npm regularly.
- Use the temporary fix if you just want a quick, one-time solution without changing system policies.
✅ With either method, you’ll be able to run npm run dev successfully in PowerShell.