Gideros Mobile Tutorial 7: Classes & Inheritance

So far we put all the code in one file. In previous example if we wanted to add more balls we would have to add several lines of  code for every ball we add – like creating new bitmap, setting new position, anchor etc. Even the functions are written in a way that they call “ball” methods directly. How to avoid this and make it more universal, more reusable?

Classes &  Instances

I will not go into details about Lua language but in short, Lua does not support classes the way that languages like C++, Java and ActionScript do. It has roots from prototype-based languages. In Lua, each object can define its own behavior through metatables so in a way we emulate OO programming and classes in Lua.

Creating instances is easy through a new function:

local sprite = Sprite.new()
local texture = Texture.new("image.png")
local bitmap = Bitmap.new(texture)
local timer = Timer.new(1000, 0)

Inheritance

It is through the inheritance that we can “emulate” the classes just like in other languages – they will have variables, methods etc. Then we put these classes into their own files and Gideros will load them automatically. We use the Core.class function to create our own classes through inheritance. We can inherit from Sprite, EventDispatcher and so on. Keyword self is the equivalent of the this pointer in C++ and it is a reference to the table which is created as part of the Class.new() command.

Here is a simple inheritance example:

Player = Core.class(Sprite) -- we create our own player class, inherited from the Gideros Sprite core class

--init() function is called automatically when we create(instantiate) new Player
-- it is like a constructor function
function Player:init()
-- do the initialization of Player instance,we set custom variables
self.health = 100
self.speed = 3
end

function Player:walk()
-- this is a Walk method of a Player class
	print("Player Walking - health:", self.health)
end

function Player:jump()
-- jump logic
end

newPlayer = Player.new() --create new Player instance
anotherPlayer = Player.new() --another Player instance
--we add both to stage
stage:addChild(newPlayer)
stage:addChild(anotherPlayer)

print (newPlayer.health)

--we call their methods
newPlayer:walk()
newPlayer.health = 50
anotherPlayer:walk()

As you can see, in the and it looks similar to OO in other languages. In above example we put all the code in main.lua but we could take all the (class,methods..) code (line 1-18) and put it in player.lua file and the rest we would leave in main.lua. This is what we will do in next example.

Now lets take the code from previous tutorial and turn it into what we learned today. First you create a ball.lua file. The code is pretty much copy/paste from or previous ball example except that we access variables and methods with self (it is also used instead of word ball). As you will see we use word self. I understand that we access class variables and class methods with self word but I am not so sure why we need to pass another self to self:addEventListener function (if you know let me know in comments, I am still learning). This self word is use everywhere so it can be quite confusing for beginners.

Put this in ball.lua (Code is commented):

-- create our own Ball class

Ball = Core.class(Sprite)

--init will run every time we create new Ball object (Ball.new)
function Ball:init (texture) --we will pass texture name
	self.direction = 3
	local bitmap = Bitmap.new(Texture.new(texture,true))
	self:setPosition(math.random(0, 270),math.random(0, 430)) --put ball on random position on screen
	bitmap:setAnchorPoint(0.5,0.5)
	self:addChild(bitmap)
	self:addEventListener(Event.ENTER_FRAME, self.rotateBall,self)
	self:addEventListener(Event.MOUSE_DOWN, self.changeBallDirection,self)
	self:addEventListener(Event.MOUSE_UP, self.fallDown,self)
	self:addEventListener(Event.MOUSE_MOVE, self.moveBall,self)
end

-- function rotating ball - executed every frame
function Ball:rotateBall()
self:setRotation(self:getRotation()+self.direction)
end

-- function scale ball - executed every mouse press
-- it is not actually mouse,it means no multi touch
function Ball:changeBallDirection(event)
	if self:hitTestPoint(event.x, event.y) then
		-- zoom the ball - jump up
		GTween.new(self, 0.3, {scaleX = 2, scaleY = 2}, {ease = easing.linear})
		soundJump:play()
		self.direction = math.random(-20,20) --random rotation speed(left or right)
	end
end

function Ball:fallDown(event)
	if self:hitTestPoint(event.x, event.y) then
		-- zoom the ball - jump up
		GTween.new(self, 1.5, {scaleX = 1, scaleY = 1}, {ease = easing.outBounce})
		soundBounce:play()
	end
end

--move the ball
function Ball:moveBall(event)

	if self:hitTestPoint(event.x, event.y) then
		local dx = event.x - self:getX()
		local dy = event.y - self:getY()

		self:setX(self:getX() + dx)
		self:setY(self:getY() + dy)
		self.x0 = event.x
		self.y0 = event.y

	 --not sure why this is here, maybe once we start moving ball
         -- we don't need to check if the ball is moved?
           event:stopPropagation()
	end
end

Gideros will automatically load and run this file when you run the program. Now create main.lua, it will be much shorter and you will see how easy is to create new balls:

-- you can apply some settings to your entire application
application:setKeepAwake(true)
application:setScaleMode("letterbox") --proper "full screen" scaling for most devices

-- global direction variable,rotate counterclockwise -3
--direction = 3

-- load background image
local field = Bitmap.new(Texture.new("gfx/field.png",true))

-- load sound that will be played when we press on ball
soundJump = Sound.new("snd/jump.mp3")
soundBounce = Sound.new("snd/bounce.mp3")

-- here we create new ball instances,we pass texture name as argument
-- Ball.new will create objects that we defines in ball.lua
--ball2.png and ball3.png are just different balls - try using your own images
newBall = Ball.new("gfx/ball5.png")
newBall2 = Ball.new("gfx/ball2.png")
newBall3 = Ball.new("gfx/ball3.png")

--add field for background and all balls to stage
stage:addChild(field)
stage:addChild(newBall)
stage:addChild(newBall2)
stage:addChild(newBall3)

and that’s it. You can see it is much clearer this way and we only need to create new Ball objects and you will have new ball with all the methods and all. Try to add new balls and you will see them appearing on the screen and each ball can be picked up, dragged etc. You can create of course a lot of classes like this, for every object you want. If you had a football(soccer) game then we have the ball class already. Then you would for example create player.lua and put all logic for all players there – they all behave in similar way. You could create a goalie.lua and referee.lua class/file for goal keeper and referee if you want because they behave differently and have different logic than players (or you could use different methods in player.lua class, as you wish). If you had an active audience you can create audience.lua class etc. You don’t need to create these classes just for objects – you can also create it for example to handle all the audio effects in the game and so on.

Passing arguments to functions

We are currently just passing a texture file name to Ball class init() method and then randomly setting x and y but you can of course change this and pass x and y .

So in ball.lua you need to modify function init (I am only showing lines that need to be changed):

function Ball:init (texture,x,y) --2 new arguments
        --everything stays the same except 
        self:setPosition(x,y) --explicitly set x and y
        --everything else is the same
end

and now we also change few lines in main.lua:

newBall = Ball.new("gfx/ball5.png",10,200)
newBall2 = Ball.new("gfx/ball2.png",200,40)
newBall3 = Ball.new("gfx/ball3.png",150,300)

This way you can create new ball at any position you wan’t. You can of course pass other arguments ,as many as you wan’t.

Gideros Mobile Tutorial 6: Fun with Events

This is a continuation of a previous tutorial. We will add some more effects in this one and we will also learn how to use some existing libraries. The entire lesson with all needed files can be downloaded here. You can use your existing main.lua file from previous tutorial or you can start new one.

Ok, so we have a rotating ball that listens to ENTER_FRAME (rotates the ball every frame) and MOUSE_DOWN (changes rotation) events. Now lets add two more events to make this “game” more interactive. We will add MOUSE_UP and MOUSE_MOVE. MOUSE_MOVE will be used when we move the ball (by holding down the finger on screen) and MOUSE_UP will be used (triggered) when we let the ball go (lift the finger off the screen). We will also use another (Lua) library called GTWeen and the easing effects.

Instead of just dumping entire code I will be pasting part by part. These parts form main.lua file.

Part one: Everything is the same like before except that we load another soundfile that will be used as a ball bouncing when we release it.

-- you can apply some settings to your entire application
application:setKeepAwake(true)
application:setScaleMode("letterbox") --proper "full screen" scaling for most devices

-- global direction variable,rotate counterclockwise -3
direction = 3

-- load the textures and create bitmap objects
--2nd texture parameter can be set to true to get anti-aliasing
local field = Bitmap.new(Texture.new("gfx/field.png",true))
local ball = Bitmap.new(Texture.new("gfx/ball5.png",true))

-- load sound that will be played when we press on ball
local soundJump = Sound.new("snd/jump.mp3")
local soundBounce = Sound.new("snd/bounce.mp3")

-- set the anchor point in the center of ball so we can rotate it
ball:setPosition(120,150)
ball:setAnchorPoint(0.5,0.5)

part 2: First, we added a GTween tween to changeBallDirection function.If you used Flash then you know what tweens are but basically it is an animation that is generated between 2 frames we specify.The term tween comes from the words “in between”. Example: We give GTween starting and ending frame of a object and GTween will create a transition. It can be moved from/to, it can be scaled from/to etc.

GTween.new(ball, 0.3, {scaleX = 2, scaleY = 2}, {ease = easing.linear})

What this does is it takes the ball object and scales both x and y times 2 in 0.3 seconds and using the easing.linear effect. Second, we create a new function that will move the ball as we slide the finger on the screen while still holding it. I’m not going to explain the mathematics of this except that we get ball coordinates with getX() & getY() and we set them with setX() & setY().

Here is the full code of part 2:

-- function rotating ball - executed every frame
function rotateBall(event)
	ball:setRotation(ball:getRotation()+direction)
end

-- function scale ball - executed every mouse press
-- it is not actually mouse,it means no multi touch
function changeBallDirection(event)
	if ball:hitTestPoint(event.x, event.y) then
		GTween.new(ball, 0.3, {scaleX = 2, scaleY = 2}, {ease = easing.linear})
		soundJump:play()
		direction = math.random(-20,20) --random rotation speed(left or right)
	end
end
--move the ball
function moveBall(event)

	if ball:hitTestPoint(event.x, event.y) then
		local dx = event.x - ball:getX()
		local dy = event.y - ball:getY()

		ball:setX(ball:getX() + dx)
		ball:setY(ball:getY() + dy)
		ball.x0 = event.x
		ball.y0 = event.y

		event:stopPropagation()
	end
end

Part 3: here will just attach event listeners that will call specific functions.

-- rotateBall function will be called on every frame change
ball:addEventListener(Event.ENTER_FRAME, rotateBall)
-- when we click on the ball it will change rotation and "jump" up
ball:addEventListener(Event.MOUSE_DOWN, changeBallDirection)
-- when we move the mouse then ball also moves
ball:addEventListener(Event.MOUSE_MOVE, moveBall)

Part 4: As you see the way we always create event is that we first write a function that does what we want and then pass it as a second argument to addEventListener function. You can also do it with anonymous function, especially if what the function does is in one or two lines so you don’t end up creating tons of strange named functions. Below we add Event.MOUSE_UP to ball:addEventListener but instead of passing function name as second parameter we create anonymous function and put the entire code there. In our case we use another GTween effect that returns the ball to starting scale 1 in 1.5 seconds but this time it uses outBounce easing effects so it looks like the ball is bouncing.

ball:addEventListener(Event.MOUSE_UP, function(event)
if ball:hitTestPoint(event.x, event.y) then
	soundBounce:play(30)
	GTween.new(ball, 1.5, {scaleX = 1, scaleY = 1}, {ease = easing.outBounce})
	end
end
)
stage:addChild(field)
stage:addChild(ball)

Try this and if you did everything correctly you should see a spinning ball. Now press AND hold the ball with your finger and the ball will scale to 2 times size in 0.3s .Drag it around and the ball will follow you. Now release it and it will fall down in 1.5s using outBounce effects 🙂 Isn’t that great? We can almost call it a game (if the goal of the game is to die of boredom moving the ball around ;).

Play with it a little, change GTween easing effects, maybe change graphics,sound effects..

Note: You can read more about GTween and it’s easing effects here. There are few “glitches” in the code – I used some random sound for bounce so it is not synchronized and also if you tap the ball too fast then the effect will fail because it will try to start new tween before it finished old one. Just ignore it for now.

Gideros Mobile Tutorial 5: Events

So far we only displayed some graphics on the screen, we even animated (not real animation though, just rotation of one bitmap) it but there was no user interaction at all. We had one event in Tutorial 4 but it was not really explained in details what it does.

Events and addEventListener

With events we handle responses and they allow us to create interactive applications. The target of an event is a listener function and an optional data value so when an event is dispatched, the registered function is called.  If the optional data value is given, it is used as a first parameter while calling the listener function.  In Gideros we have built-in events generated by the system (e.g. ENTER_FRAME event, touch events, timer events, etc.) and custom events which can be generated by the user.

Here are few examples of kinds of events:

  • ENTER_FRAME  – this event is dispatched every frame. If your game is 60 fps then 60 times/s
  • MOUSE_DOWN – dispatched every time someone presses “mouse” button
  • MOUSE_UP – dispatched every time “mouse” button is released
  • TOUCHES_BEGIN – dispatched every time screen is touched
  • TIMER  – events tied to timers

Just to make it less confusing: We don’t actually use mouse on smartphones of course so you can use MOUSE_ events to handle only a single touch on specific object. In case you want to handle multi touch then you should use TOUCHES_ events because they will provide you with more information about current touch id and all available touches on the screen.

Here is a quick example of an event and function it calls. Let’s suppose we already loaded bitmap ball.

-- function that will be called every time event is dispatched
function rotateBall(event)
 --some code to rotate the ball
end
-- we attach event to ball's addEventListener
ball:addEventListener(Event.ENTER_FRAME, rotateBall)

So basically what this means is we attached addEventListener to our ball object and what it will do is it will call function rotateBall on every frame change. If we would have Event.MOUSE_DOWN instead then rotateBall function would be called every time we press/touch the ball.

At the end of this tutorial we will have a rotating ball that will randomly change direction, rotation speed and play a sound every time you press it.  In next tutorial (tutorial 6) we will add some events that will make the ball dragable and the effects of picking up and dropping the it.

Ok, enough of theory, let’s build an app (with graphics and sound effects). Create project “Events” and add main.lua.

Note: So far we put all the files in one folder but as the app grows larger it is better to be organized. So we will put graphics in gfx  folder and sounds in snd  folder. I prepared a file for you so download it and extract it to your project folder. Important: Gideros project folder  structure is independent of your OS folder structure so you will have to create folder in Gideros by yourself and add existing files there. In theory this means that you might have all the files in one folder on disk but in Gideros they are nicely structured – or the opposite of course!

Add this code to main.lua :

-- you can apply some settings to your entire application
application:setKeepAwake(true) 
application:setScaleMode("letterbox") --proper "full screen" scaling for most devices

-- global direction variable,rotate clockwise 3
direction = 3

-- load the textures and create bitmap objects
--2nd texture parameter can be set to true to get anti-aliasing
local field = Bitmap.new(Texture.new("gfx/field.png",true))
local ball = Bitmap.new(Texture.new("gfx/ball5.png",true))

-- load sound that will be played when we press on ball
local soundJump = Sound.new("snd/jump.mp3")

-- set the anchor point in the center of ball it rotates around center
ball:setPosition(120,150)
ball:setAnchorPoint(0.5,0.5)

-- function changeBallDirection - executed every frame
function rotateBall(event)
	ball:setRotation(ball:getRotation()+direction)
end

-- function changeBallDirection - executed every mouse press
-- it is not actualy mouse, it means no multi touch
function changeBallDirection(event)
		soundJump:play()
		direction = math.random(-20,20) --random rotation speed(left or right)
end

-- rotateBall function will be called on every frame change
ball:addEventListener(Event.ENTER_FRAME, rotateBall)
-- when we click on the ball it will (or not) change direction
ball:addEventListener(Event.MOUSE_DOWN, changeBallDirection)
-- when we move the mouse then ball also moves

stage:addChild(field)
stage:addChild(ball)

Run it and you will have a nice rotating ball on the field. Now press the ball and it will randomly change the rotation direction and speed, not to mention it will play a sound every time you press it. If you do it long enough you might even make the ball stop rotating (speed=0) 😉

But what a minute – the ball changes rotation/speed even if we click anywhere on the screen! That is not very useful. No worries though, it is easy to fix this,we just need to wrap the reaction between 2 lines. Replace the changeBallDirection function with this:

function changeBallDirection(event)
	if ball:hitTestPoint(event.x, event.y) then
		soundJump:play()
		direction = math.random(-20,20) --random rotation speed(left or right)
	end
end

So we just wrapped the code with hitTestPoint function (lines 2 and 5). This hitTestPoint function simply checks if the given coordinates are in bounds of the sprite/object. Run it and now it only works if you “click” on the ball.

I don’t want to make this tutorial too long and hard to comprehend so we will add some additional events in the next tutorial.

Gideros Mobile Tutorial 4: Graphics

Textures, bitmaps and sprites

Most of the games use graphics so let’s learn how to display it on the screen and apply some transformations to it. You will also meet 3 new object types: textures, bitmaps and sprites.

  • Texture – class that is used to load an image file. You can’t really do much with it, it just holds the data stored in the image file
  • Bitmap – it inherits from Sprite and wraps a Texture object for on-screen display.
  • Sprite – think of it as a object that groups other objects (or separate them in different layers) like images, texts and shapes

Let’s do a simple example so it will be more clear. First, I suggest you to download Gideros Asset Library (Contains set of backgrounds, tilesets, texture, sprites, icons and music files for beginners like us) . You will find this Character-Pink-Girl.png in the Tilesets\PlanetCute PNG directory. I am also including all files needed for this tutorial in the ZIP at the end of the post.

Character Pink Girl

Create new project “Graphics”,  create main.lua and add this PNG to your project.  Add this code to main.lua

-- you can apply some settings to your entire application
application:setKeepAwake(true) --prevent screen dimming on your phone.
application:setBackgroundColor(0x65E17b) -- set background color of application to look like green grass

-- load some textures and create bitmaps from them
-- We will create 2 bitmaps using the same texture to show the difference
local girlTexture = Texture.new("Character Pink Girl.png") --load new texture into girlTexture variable
local girl = Bitmap.new(girlTexture) --create bitmap girl that holds girlTexture texture.
local upsideDownGirl = Bitmap.new(girlTexture) --create another bitmap upsideDownGirl with girlTexture texture
upsideDownGirl:setAnchorPoint(0.5, 0.5) --set the anchor point in the middle of the bitmap
upsideDownGirl:setRotation(180) --lets rotate this second bitmap upsideDownGirl 180°

-- let us set some properties then we display these objects on the screen (add them to stage)
girl:setPosition(30,100)
upsideDownGirl:setPosition(70,350)
stage:addChild(girl) -- display girl on the screen
stage:addChild(upsideDownGirl) -- display upsideDownGirl to the screen

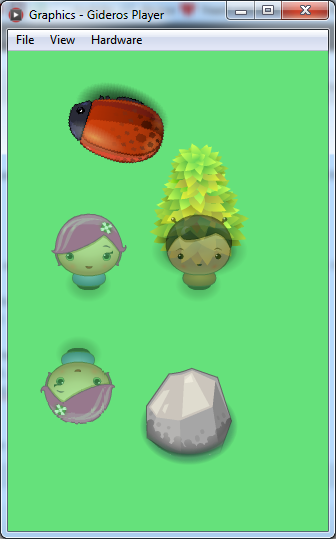
And there you have it! Run Gideros Player and you should see 2 girls (one upside down) on the green background. As you can see we used the same texture for 2 different bitmaps.  Texture is just a picture and bitmap is an object that contains this texture and does all kinds of modifications on it.

Maybe let me explain just this part:

upsideDownGirl:setAnchorPoint(0.5, 0.5) --set the anchor point in the middle of the bitmap

Each Bitmap object has an anchor point that affects the positioning of the texture displayed. By modifying the anchor point, you change the origin of the texture. Values go from 0 to 1 and you can see here how anchor point moves.  By default it is set to 0,0. We usually want it to rotate on the spot so we set it to center of the texture to the origin (0.5, 0.5)

anchor point

Fun with Textures, Bitmaps and  Sprites

Let’s modify the code to include sprites and some other things. I will mostly comment just the new code:

-- you can apply some settings to your entire application
application:setKeepAwake(true)
application:setBackgroundColor(0x65E17b)

--load some textures and create bitmaps from them
local girlTexture = Texture.new("Character Pink Girl.png")
local girl = Bitmap.new(girlTexture)
local upsideDownGirl = Bitmap.new(girlTexture)
upsideDownGirl:setAnchorPoint(0.5, 0.5)
upsideDownGirl:setRotation(180)

-- lets add some more textures and create bitmaps out of them so we can manipulate them
-- as you see we can pass and create texture.new as an argument in bitmap.new so only 1 line is enough
local boy = Bitmap.new(Texture.new("Character Boy.png")) --create texture and bitmap in 1 line
local bug = Bitmap.new(Texture.new("Enemy Bug.png"))
local tree = Bitmap.new(Texture.new("Tree Tall.png"))
local rock = Bitmap.new(Texture.new("Rock.png"))

-- let's group all boys and girls together as people with sprite object
-- we will later be able to manipulate all these boys and girls at the same time
local people = Sprite.new()

-- who is people? What objects are in group people?
-- we could add rock or tree to people too but that wouldn't make sense
people:addChild(girl) --girl is people
people:addChild(upsideDownGirl) --upsideDownGirl is people too
people:addChild(boy) --boy is people

-- place bitmaps on the screen/stage
girl:setPosition(30,100)
upsideDownGirl:setPosition(70,350)
boy:setPosition(140,100)
bug:setPosition(100,100)
tree:setPosition(140,60)
rock:setPosition(130,250)
people:setAlpha(0.5) -- we set transparency to people so you will see how this impacts entire group/sprite

stage:addChild(bug)
stage:addChild(tree)
stage:addChild(rock)
stage:addChild(people) --we add sprite (group) to stage,no need to add one by one

-- set anchor point of bug to center
bug:setAnchorPoint(0.5, 0.5)

--rotate the bug -1 every frame
stage:addEventListener(Event.ENTER_FRAME, function()
bug:setRotation(bug:getRotation()-1)
end)

Run this and you should see something like this (on tablet it will be smaller):

graphics-gideros

As you can use grouping bitmaps into sprites is useful because you can manipulate the entire sprite(group). Sprite can be a little confusing word for those who remember C64 and earlier because at that time sprite meant objects composed of images. In Gideros sprites are used to group other objects (or separate them in different layers) as images, texts and shapes. In example above we made sprite people containing all “people”. You could also make a sprite “nature” that would contain bitmaps like trees, rocks, sun etc. Grouping elements into sprite is useful because we can for example turn off all objects contained in one sprite. In example above we set transparency of entire people sprite to 50% so you can see all people are partially transparent.

The last thing is the rotation of a bug. We will cover events and event listeners soon so don’t think about this too much.  In short: We add event listener to stage that calls a function every time a frame changes. What does this function do? It simply rotates the bug 1° counter clockwise. Note: the bug is not rotating around center because the texture is not square.

You can download all files (graphics and main.lua) for this tutorial here.

Gideros Mobile Tutorial 3: Shapes

It’s nice to have something else on the screen than just text. Let’s try to draw some shapes. I will leave out step-by-step explanation on how to add files to projects, how to start Gideros Player etc because this was covered in previous tutorials.

Drawing Shapes

You can draw primitive shapes with Gideros on the screen.  Create new project, name it “Shapes”, add new main.lua file and open it in editor.

Remember that in Gideros we create every new object (sprites,textfield,shape,bitmap…) with the keyword new. Add this code (comments — are in the code) to main.lua, run the player and you will see black line on your screen.

local myShape = Shape.new() -- create the shape object assigned to variable myShape
myShape:beginPath()         -- We have to tell shape to begin a path
myShape:setLineStyle(1)     -- set the line width = 1
myShape:moveTo(100,100)     -- move pen to start of line
myShape:lineTo(200,100)     -- draw line to new coordinates
myShape:endPath()           -- end the path
stage:addChild(myShape )    -- add the shape to the stage - display it

I think it is not hard to see what is going on here. We can use pen & paper analogy to explain it even simpler: The “moveTo” function is like lifting a pen off the paper and moving it to a different location without drawing anything. The “lineTo” function draws a straight line from current pen location to the destination location. As you can see once we create new Shape object named myShape we always use “myShape:” to change it’s properties, do something with it etc.

I am sure developers understand the screen coordinate system (line from 100,100 to 200,100) but here is the coordinate system just in case:
coordinates

Fun with Shapes

Now let’s draw a rectangle, fill it will color and apply some transformations learned in previous lessons. Shapes are “anchored” at the graph origin (0,0). The anchor point affects how the shape behaves when manipulated (e.g., rotated, scaled). If we want to prevent out rectangle from previous example to move off the screen we first create the shape at 0,0 coordinates (left top corner) and then move it to 100,100.

Modify the code so it will look like this:

local myShape = Shape.new() -- create the shape object assigned to variable myShape
myShape:beginPath()         -- We have to tell shape to begin a path
myShape:setLineStyle(2)     -- set the line width = 2
myShape:setFillStyle(Shape.SOLID, 0xFF0000) -- solid red fill color
myShape:moveTo(0,0)     -- move pen to start of line
myShape:lineTo(100,0)     -- draw top of rectangle
myShape:lineTo(100,100)     -- draw right side of rectangle
myShape:lineTo(0,100)     -- draw bottom of rectangle
myShape:lineTo(0,0)     -- draw left side of rectangle
myShape:endPath()           -- end the path
-- now we apply some transformations to the shape we created
myShape:setPosition(100,100) -- move the entire shape to 100,100
myShape:setScale(1.2,1.5) -- scale x by 1.2 and y by 1.5. The shape wont be rectangle anymore
myShape:setRotation(40) -- rotate shape by 40 degrees
stage:addChild(myShape )     -- add the shape to the stage - display it

Play with it a little, create different shapes.

SyntaxHighlighter Evolved Lua Brush (Language) for WordPress

If you need to add Lua support for WordPress SyntaxHighlighter Evolved plugin then here is one way:

Download this ZIP file. It contains 2 files:

  • shBrushLua.js – Lua Brush file
  • shBrushLua.php – WordPress plugin

Extract these 2 files and use FTP to navigate to your plugins folder (usually /public_html/wp-content/plugins), create new directory, for example syntaxhighlighter-brushes, and upload these 2 extracted files.

Go to WordPress admin -> Plugins -> Installed Plugin and activate “SyntaxHighlighter Evolved: Lua File Brush”,

Now you will be able to use Lua language with this code:

[[lua]
— some Lua code here
print “Hello World!”
[/lua]]

and it should display something like this :

-- some Lua code here
print "Hello World!"

Gideros Mobile Tutorial 2: “Hello World”

Hello World

Every tutorial starts with “Hello World” and who am I to break this tradition? 🙂 Please keep in mind that I will not be teaching Lua language, concepts of Objects, functions etc.  I am assuming that you are a developer who knows at least one language and have a basic understanding of how programing works. Again, I am just learning Lua too so you don’t need to be master Lua to follow this tutorial.

We will create 2 versions of “Hello World”  – one that prints to console and one that prints to your mobile device phone screen (or Gideros Player).

Hello World on console

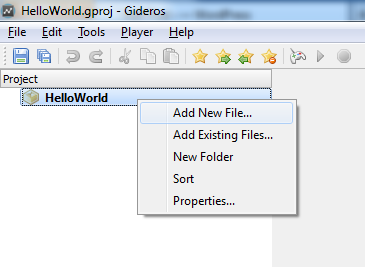
Start Gideros(Gideros Mobile Studio) and select File->New Project from menu.  Name the project HelloWorld and browse to directory where you want to store your projects and click OK.  Right click on the HelloWorld project icon and select Add New File as seen below:

gideros_add_new_file

name it main.lua and click ok. This is how you will add new code files to your project. Double click it so it opens in the editor.

Now add just one line:

 print "Hello World!"
 

That is all you need.

Start the the local player (Player->Start Local Player) and press play button on Gideros menu. Program will execute and… nothing will happen on Player. But check the Output window and you will see something like this:

main.lua is uploading.
Uploading finished.
Hello World!

There is our hello world! Of course this is handy when we need to debut or test something but what we want is this text to appear on Player or our smartphone.

“Hello World” on Gideros Player / Smartphone

This takes few more lines but it is still easy. Delete the code in our editor and add this :

-- HelloWorld.lua script
local myTextField = TextField.new(nil, "Hello World!")
myTextField:setPosition(40,100)
stage:addChild(myTextField)

Save it, run Player and you will see text “Hello World” displayed there or on your smartphone (you have to run the Gideros app on your smartphone first of course). Great, your first mobile app is finished!

Let me explain this line by line

-- HelloWorld.lua script 

This is a comment so we can ignore it. In Lua you start one line comments with --. Please check some Lua tutorials on net for more.

local myTextField = TextField.new(nil, "Hello World!")

What we do here is create new text field object with the text Hello World!. Word nil just means that Gideros will use the default font. We assign this to local variable myTextField.

myTextField:setPosition(40,100)

Our myTextField is now TextField object so we can access and use/set all kinds of methods, events and properties. In this case we simply set the position of our textfield to appear on screen (X=40, Y=100).

stage:addChild(myTextField)

In all our previous lines we just created textfield, set its parameters but we have to display it on our screen. Think of stage as screen for now so everything that we want to display will have to be added to stage as its “child”.

Fun with text

Now let’s have some fun with text. Download this font from 1001freefonts.com and extract it to your HelloWorld project folder. Right click on the HelloWorld project icon and select Add Existing Files.. and select the “orange juice 2.0” font.

Now replace/modify your code so it will look like this(comments in the code):

-- HelloWorld.lua script
-- We define the font we will use and set the size to 48
local myfont = TTFont.new("orange juice 2.0.ttf", 48)

-- create 2 text fields with text "Hello World!" and "How are you?" which use myfont
local myTextField = TextField.new(myfont, "Hello World!")
local oneMoreTextField = TextField.new(myfont, "How are you?")

--for myTextField we only set the position of the text on screen
myTextField:setPosition(10,50)

-- for oneMoreTextField we set all kinds of properties - position, color (in HEX), rotation.. 
oneMoreTextField:setPosition(40,100)
oneMoreTextField:setRotation(31)
oneMoreTextField:setTextColor(0xFF0000)

-- add both to stage(screen) so we can see them
stage:addChild(myTextField)
stage:addChild(oneMoreTextField)

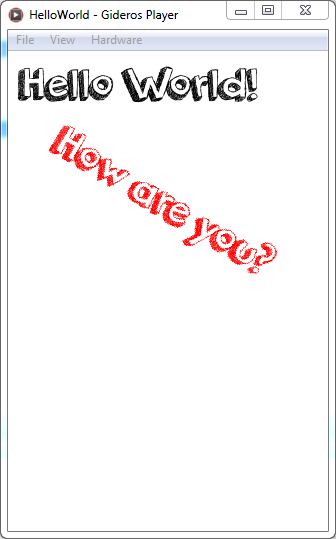
This is what you should see if you did everything right. Cool! hello_world_fun

Gideros Mobile Tutorial 1: Installation and interface

Install Gideros Mobile

This is fairly simple: go to Gideros Mobile website and download SDK then run setup. It’s just few “Next” clicks. After you are done it is best to go to their registration form and register for free. This way you will be able to export and build your Android (you can’t export IOS apps on Windows due to Apple not allowing to install their SDK if I am not mistaken) apps with File->Export Project in Gideros Mobile Studio (GMS).

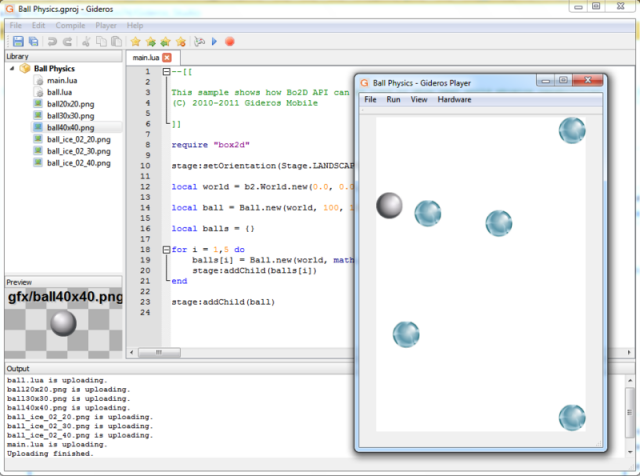
Pin the GMS to your taskbar and run it. Here is the explanation of most important parts of GMS (click on the photo to see it in full size):

gideros

Library: This is the list of your Project files  – .lua files, graphics, sounds and so on
Preview:  When you click on image in your Library you will see it displayed here
Editor: This is where you edit code (.lua) files. Double click on file in Library to open it.
Gideros Player: Your program will run in this window. This is how your app will look on smartphone.
Output: Console window. You will see all text sent to console here,also upload progress, errors..

Everything is self evident, I will only explain how to start the player. When we save the project we wan’t to see how it will look on our mobile. What we need to do is click Player->Start Local Player in menu and the Player will start. You will see the date and IP displayed.  After “Gideros Player” opens, the start and stop icons will become enabled:

gideros_player_start_stop

You can now press play and stop totest your game or app in this player. You can also zoom the player, rotate it, set framerate etc. All these options are found on Gideros Player window.

How to test you app instantly on your smartphone

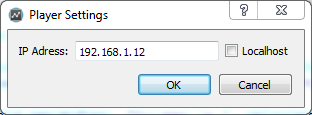
One of the best things about GMS is that you can instantly run your project  on your smartphone via wi-fi. To run project on Android device you need to install the GiderosAndroidPlayer.apk (comes with the installation) on your device. Start the installed app and it will display IP of your device. Open Player->Player Settings and uncheck the localhost option (use localhost to use player on your computer). Now add the IP  that you see on your smartphone and click OK. In my case it was 192.168.1.12 but it will be most probably different on your smartphone.

player-settings

If everything is ok then when you press play you will be able to see your game running on your smartphone! You can edit and save the code then press play again and your game will instantly be updated on your smartphone. How cool is that? 🙂

In the next lesson we will create first “Hello World” program.

Gideros Mobile Tutorial : Mobile Game Development

Why am I learning Mobile Game Development?

I always enjoyed making games on C64 and Amiga (AMOS Professional was great!) when I was a kid. Platformers and turn-based RPG games. It is now different time and smartphone games are all the rage. I always wanted to try making some simple mobile game but the first problem was that I am a busy web developer (Codeigniter then Laravel ..) so I don’t have much time for this. The biggest turn off for me was that you have to learn Java or Objective-C to develop for Android or IOS. Yes, it is not hard but somehow I don’t like to learn these languages (and I don0t have MAC). I tried hybrid app development (phonegap,intel xdk..) for a while but using HTM5/CSS somehow just didn’t feel right, especially for gaming. Maybe one day we will get there for now it just can’t compete with native games.  So I always ended up giving up on mobile development….. until I discovered there is a “3rd” way! (Yes, I am new to this 😛 )

Mobile Game Development with Gideros / Lua

Somehow I found Corona SDK (I decided to not use it after reading some forums), Moai, Monkey but finally I decided to use Gideros. I couldn’t believe that you can make fast, almost native speed apps with a language that is not Java or Obj-C! I never used Lua so I am still learning it but somehow it just feels right. So far I am loving Gideros! It is simple, it is free, it has in-built editor and a lot of plugins to get you started. Sure, it is not for the most complicated 3D games but for simple games it is great! One of the best things for me is that you simply install their app on your smartphone and you can test you apps literally instantly over wi-fi! Modify some code, save,  click play and you app will play on your smartphone/tablet!

What do I need to start with Gideros Mobile Game Development?

First, download Gideros for your OS. I will use Windows version.  Second, you should try to get familiar with Lua scripting language.

What kind of tutorial will this be?

I am just a beginner in mobile development, Lua and Gideros so this is not for well versed mobile dev coders. I am making these tutorials so I can come back if I forget things and to write down my progress so in a way you can learn with me. I gave myself a 30 day challenge to see how it goes.  I will start with installation and then with basics.

First part is coming tomorrow, stay tuned.

PS: My main focus is of course still web development with Laravel so I will continue posting Laravel articles.  The blog is not turning itno mobile dev blog. This is just a side “project”,  a learning experience I want to share 🙂