Fatal error: Unparenthesized `a ? b : c ? d : e` is not supported in DatabaseInterface.php on line 615

You will get this error when you upgrade your PHP 7 to PHP 8 (or even 7.3 to 7.4 or something like that) but keep your old phpmyadmin version. This error can be in any code but in our case it is in phpMyAdmin\libraries\classes\DatabaseInterface.php file so we need to fix it for phpMyAdmin. We will not fix the code itself because in this case it is not needed.

The solution here is for Laragon. It is a little longer, but easy, Laragon oriented solution so you can better understand how it works. Scroll down to the end to do this manually (faster).

Laragon solution

It is possible that your Laragon came with older phpMyAdmin version. So we will tell Laragon to download the latest one.

Open your {INSTALLATION_PATH}\laragon\etc\apps\phpMyAdmin folder. Just in case, backup this phpMyAdmin folder first. Then delete all files in it so the folder is empty.

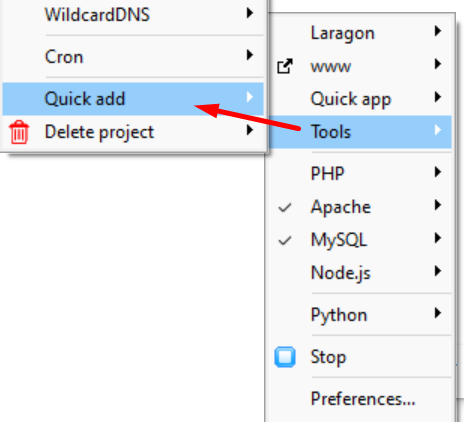
Right click the laragon tray icon, then Tools then Quick add and then Configuration…

laragon options configuration quick app

this will open packages. conf file in your text editor. Find this line :

# phpMyAdmin
phpmyadmin= *******

of course you will see a link to phpmyadmin download page. It will pobably be link to a specific version.

Change it to this (latest version of phpmyadmin) and save the file.

# phpMyAdmin
phpmyadmin=https://www.phpmyadmin.net/downloads/phpMyAdmin-latest-all-languages.zip

Note: if the second line starts with # you need to delete the # character.

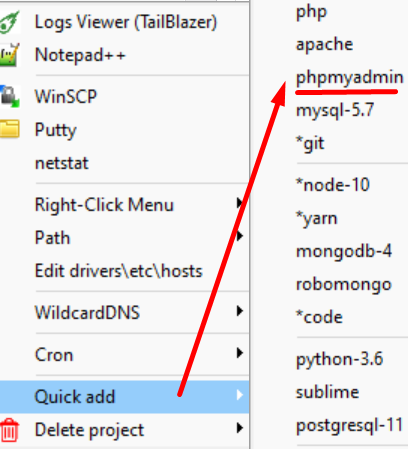
Right click the laragon tray icon again, then Tools then Quick add and then phpmyadmin… and Laragon with automatixally downlaod the latest phpMyAdmin and install it.

laragon phpmyadmin

Restart Laragon, open yourproject.test/phpmyadmin/ in your browser (your project will be called different than yourproject.test) and phpmyadmin should work.

Manual solution

1. backup and then delete all files in {INSTALLATION_PATH}\laragon\etc\apps\phpMyAdmin folder
2. Download the latest version of phpMyAdmin from https://www.phpmyadmin.net/downloads/
3. Extract the content of downloaded ZIP file into a empty phpMyAdmin folder
4. Restart laragon and phpMyAdmin should work.

Download latest Laragon & Install Laravel 9

I like to use Laragon sometimes for my Laravel development. I had Laragon 5 installed and wanted to create new Laravel 9 project. When I selected Quick App-> Laravel it installed Laravel 8! I looked at Laragon website but the latest one there is Laragon 5 with PHP 7. Laravel 9 requires PHP 8.

Good news is that Laragon has already updated to Laragon 6 with PHP 8 but for some reason there is no downlaod link on their downlaod page (at the time of writing this post).

So what you need to do is go to Laragon github page and download latest laragon-wamp.exe from there. Then you do a backup of your current laragon folder on your PC and then just install the latest Laragon – it will keep all your files and settings, just upgrade to latest Laragon with PHP 8.

After you are done right click the Laragon icon, quick app and Laravel and it will install Laravel 9 (and probably next versions as long as they require PHP 8)

WordPress Custom Fields missing in admin (post or page)

This is a very specific problem so it might only work for some. After I updated WordPress and all plugins on an old site that used WordPress Custom Fields to enter some data, the Custom Fields in admin disappeared. I could add a new post but Custom Fields were nowhere to be sen, not even in the screen options.

Long story short, after doing some searching on the net, I found out it was ACF (Advanced Custom Fields) fault. In new version of the plugin they disable WordPress Custom Fields because they think you are using ACF anyway so no need for both. Not sure I agree but here is 2 ways you can try to solve it:

  1. If you activated ACF but are not using the plugin, just disable it.  WordPress Custom Fields should come back.
  2. If you want to keep both then add this code to your theme’s function.php file (the best is the child theme, if you have one)
    add_filter('acf/settings/remove_wp_meta_box', '__return_false');

WordPress Custom Fields should reappear now.

Get WordPress Post ID Outside the Loop

It is easy to get a post ID in WordPress. To echo it on screen we write:

 <?php the_ID(); ?>

To store the ID into variable we use something like this :

 $id = get_the_ID();

There is one caveat though: if you read the description on WordPress codex it says this in both cases: This tag must be within The Loop.

So if you ever wanted to retrieve or display the WordPress post ID in footer or header or outside of The Loop you might end up being disappointed because the ID returned is not the correct one (usually we always get the same id, most probably the last one?)

Now I am not going to go into technical details or why is that so here is the solution that worked for me. You

$post = $wp_query->post;
echo $post->ID;

There are some other ways with global variables and some other but it seem it doesn’t work for everyone. This one worked on the first try. Let me know in comments if it doesn’t work for you.

Turn On Error Reporting on WordPress Blank / White Screen of Death

There is nothing worse than getting blank screen when developing for WordPres – also ‘officially’ known as The White Screen of Death – because you have no idea what went wrong. No errors, nothing useful, just blank screen. It’s even worse when it just appears out of nowhere. This happened to me few times in the past and then just recently. Woke up in the morning and the entire site (not this one) displayed just blank white page.

First thing you should do is rename the plugins folder and see if it works. If yes then the problem is in one of the plugins so if your admin works start disabling plugins one by one. If admin doesn’t work then try renaming plugin folders via FTP. If this doesn’t help then rename the themes folder and see if the problem was caused by one of your theme.

This didn’t help in my case. So I went to WordPress site (link below) and insert the code they recommended! It STILL didn’t work and there were no errors displayed! So finally I modified the code a little and finally the error appeared! I don’k know why are they posting a solution that doesn’t display the errors.

Here is the code that started showing errors and I finally able to fix it. Still the mistery remains why did the blank screen start appearing when it was working just fine yesterday when I went to bed. Ah, the ‘joys’ of developing.

Open the wp-config.php file in the root directory of your worpress and insert this just above the /* That's all, stop editing! Happy blogging. */ comment. Refresh the WordPress and hopefully you will see PHP error telling you what went wrong.

// Enable WP_DEBUG mode
define('WP_DEBUG', true);

// Enable Debug logging to the /wp-content/debug.log file
define('WP_DEBUG_LOG', true);

// Enable display of errors and warnings 
define('WP_DEBUG_DISPLAY', true);
error_reporting(E_ALL);
@ini_set("display_errors", 1);

// Use dev versions of core JS and CSS files (only needed if you are modifying these core files)
define('SCRIPT_DEBUG', true);

After you fix the error don’t forget to remove or at least comment the added code.

In case it didn’t work, here are some more steps to try to fix it:

Common WordPress Errors and Debugging in WordPress

Enable qTranslate for WordPress 4

Seems like qTranslate is not really updated anymore or at least it is updated very slowly. So when I updated WordPress to new version I got this message and qTranslate editor in admin was disabled.

The qTranslate Editor has disabled itself because it hasn’t been tested with your WordPress version yet. This is done to prevent WordPress from malfunctioning. You can reenable it by clicking here (may cause data loss! Use at own risk!). To remove this message permanently, please update qTranslate to the corresponding version.

I guess the easiest way is to just click on the link and it will probably enable itself. I googled it and it seems some people might have problems with that. So the solution that worked for most people is this:

First, open wp-content/plugins/qtranslate/qtranslate.php file and change line 90 from

define('QT_SUPPORTED_WP_VERSION', '3.7.1');

to

define('QT_SUPPORTED_WP_VERSION', '4.0');

just save it and that’s it.

Of course if WordPress is updated to new version qTranslate will disable itself again. What you can do is enable it for all version by dynamically inserting current WordPress version, like this

define('QT_SUPPORTED_WP_VERSION', get_bloginfo('version'));

qTranslate will now work for all (future) versions of WordPress.

Hint: You can find out your WordPress version on the bottom right in the admin or by opening a file /wp-includes/version.php and checking the $wp_version variable on the top.

Note: Do this on your own risk. It seems to work for most people but beware you might loose your data if something goes wrong. The safest way is to wait for author of qTranslate to update it but it seems this is not happening.

Laravel erorr: Call to undefined method Illuminate\Foundation\Application::getConfigLoader()

After I resolved my speed problems with Composer (see the post here ) I got this error once the Composer ended updating dependencies:

Fatal error: Call to undefined method Illuminate\Foundation\Application::getConfigLoader() in E:\path-to-my-project\vendor\laravel\framework\src\Illuminate\Foundation\start.php on line 106

As I already mentioned in my previous post I don’t know if this was due to me canceling composer updates several times or something else but the same error appeared when I opened my project URL in web browser.

The solution is simple: Delete bootstrap/compiled.php file.

After that run php artisan optimize command, which will generate new compiled.php file. I am not sure if this last step is necessary because everything seems to work even without the compiled.php file but I would advice to run this command just in case and regenerate compiled.php file.

ReflectionException: Class SomeClass does not exist – Laravel 4

Note: This post was written while Laravel 4 was still in beta.

When you add a new class (controller) in Laravel 4 you will most probably get

ReflectionException: Class SomeClass does not exist

SomeClass is of course the name of your new class.

Why does this happen? The file/controller is there, the class is there – it works in Laravel 3 so why doesn’t it work in Laravel 4?

The reason for this is that because of the performance reasons Laravel 4 (beta) has a static list of all classes that need to be autoloaded. Since you added your new controller Laravel doesn’t know about it yet. Hopefully this will be automated in the future but right now what you need to do is open your command prompt and type this (on Windows):

 >composer dump-autoload

If you get 'composer' is not recognized as an internal or external command error or Could not open input file: composer then use this version (also go to your project directory where composer.phar is located):

 >php composer.phar dump-autoload

Composer will (re)generate autoload files and your new controller will work.

‘git’ is not recognized as an internal or external command

If you installed Git from windows.github.com you might get this error while running ‘git’ from windows command prompt(cmd):

‘git’ is not recognized as an internal or external command, operable program or batch file.

What you need to do is add Git path to Windows Environment Variables.

First, search for git.exe with windows search. You will find it in directory similar to this one:

C:\Users\user\AppData\Local\GitHub\PortableGit_76ds5d7f65adsf76as5f7as6f5asdf\bin

Add this to Windows Environment Variables :

  • right mouse-click “My Computer” and select “Properties”
  • if on Windows 7 then click on “Advanced system settings”,
  • open “Advanced” tab and click “Environment Variables”,
  • highlight/click on the “Path” variable under “System variables” and click “Edit”,
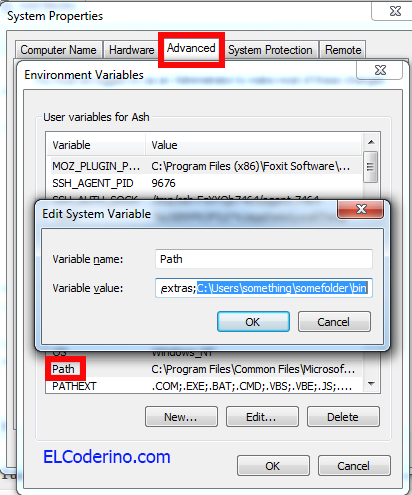
  • add your specific path to front of “Variable value” field or at the end, separated by a semicolon from the existing entry. Do not add a space between ; and last entry.Also, do not add ; after the last entry

Let say, just for example, that the Git.exe is in C:\Users\something\somefolder\bin folder. So when you edit your path variable it should look like this (thanks to my super Photoshop skills you can see that we are on Advanced tab, that we are editing Path variable and that I excel at making watermarks):

edit system variable git

Click Ok few times and try running Git again.

Warning: file_get_contents(): Unable to find the wrapper “https” – did you forget to enable it when you configured PHP?

I was installing Composer via CLI terminal for a new Laravel project and got this error:

Warning: file_get_contents(): Unable to find the wrapper “https” – did you forget to enable it when you configured PHP? in Command line code on line 1

The solution is easy: Open php.ini file (mine is located in xammp/php/php.ini ) and add (or uncomment) extension=php_openssl.dll in the list of Dynamic Extensions. Restart Apache and it should work.