Create and use SSH key to login to your server

OK, this is one of those posts where I am mostly writing down what I did to remember it for next time and not one of those generic advices with all kinds of options. Hope it still helps you.

Generating SSH keys

Let say you want to connect to your hosting server with your computer (Windows) using SSH keys and not use password anymore. Passwords are annoying and less secure.

Open the Windows Terminal and type ssh-keygen

You will be prompted to specify the location and filename for the key pair. By default, it will be saved in the user’s home directory under `C:\Users\\.ssh\`. I just pressed enter.

Next, you’ll be prompted to enter and repeat a passphrase for the key. If you want you can create one but I just pressed enter twice to skip it. SSH key pair will now be generated: a private key (`id_rsa`) and a public key (`id_rsa.pub`).

You can now use the public key (`id_rsa.pub`) for authentication purposes with remote servers or services. The private key (`id_rsa`) should be kept secure and not shared with anyone.

Adding public SSH key to your hosting account via Cpanel

Login to you hosting account’s Cpanel and click on ‘SSH Access” then “Manage SSH Keys” and then “Import Key”.

Now you can go back to Windows and open that id_rsa.pub file and copy the content of it or you can type this in terminal (assuming the name of your public SSH key id_rsa.pub):
clip < C:\Users\\.ssh\id_rsa.pub

keep in mind you have to use path and name of file on your computer, not just copy paste the above.

Then go back to cpanel’s “Import SSH Key” page and give it a name (like My PC), input your passphrase (if you have one) into passphrase field and then paste the public key into field for public key. I left private key field empty. Click Save or Import.

You will be taken to Public Keys page. If your key is NOT authorized then click Manage next to your key and click Authorize and save.

Connect to server via terminal

In your server’s Cpanel you should find username, IP and maybe port. Then you type:’

ssh username@SERVER-IP:port

hit enter and you should connect to server without the need for password.
Should I create Git repository in public_html or different folder?

It is generally not recommended to create a Git repository directly inside the `public_html` folder of your web server. The `public_html` (or `public` or `www`) directory is typically the web server’s root directory, and its contents are accessible to the public through the internet. Placing your Git repository there could expose sensitive information and potentially compromise your code’s security.

Instead, it is a good practice to keep your Git repository outside the `public_html` folder and use a deployment strategy to publish your code to the web server.

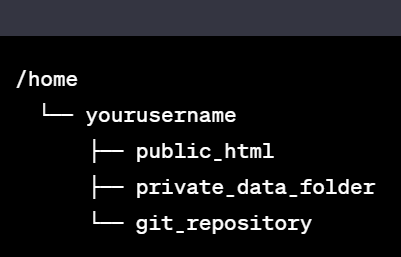
Here’s a common directory structure:

In this setup, the `public_html` folder contains only the files necessary to serve your website to the public. Your actual code resides in the `git_repository` folder, which is not accessible to the public.

When you’re ready to deploy a new version of your website, you can use various methods to transfer the relevant files from the Git repository to the `public_html` folder. Some common deployment strategies include:

1. Git pull (or clone) on the server: SSH into your server, navigate to the `git_repository` folder, and pull the latest changes from your remote repository. Then, copy the required files to the `public_html` folder.

2. Deploy script: Write a script that automates the deployment process. The script can pull the latest changes from the Git repository and copy the necessary files to the `public_html` folder.

3. CI/CD tools: Use continuous integration and continuous deployment (CI/CD) tools like Jenkins, Travis CI, or GitHub Actions to automate the deployment process whenever you push changes to your Git repository.

Using one of these deployment strategies will help keep your sensitive code and configuration files secure, while still allowing you to publish your website to the public_html directory for the world to access.

Disable new Windows context menu

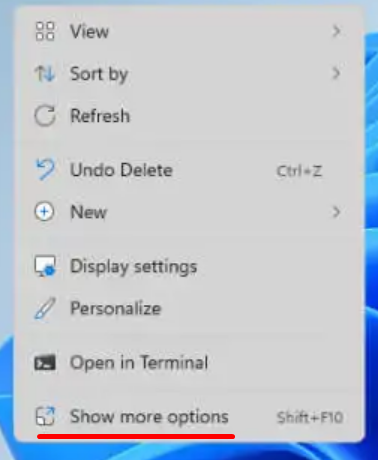
I am not really a fan of new windows (10,11) context menu because it somehow always seems that things I need require an additional click. It is quite annoying to have to click on “Show more options”:

windows 11 context menu

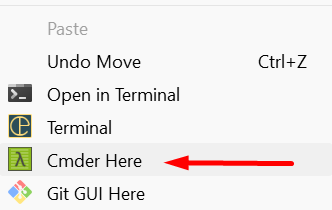
In my previous post, I taught you How to add “Open Cmder Here” in context menu on Windows. Of course it is not in new context menu, it is in the “old’ one which needs another click on the “Show more options” menu option.

Somehow Windows doesnt allow us to revert back to old menu or even add menu items. There are many step by step tutorials on net on how to do it manualy in registry but here is the easiest one I found. One command for disabling this new context menu and one for enabling it back.

Paste this code into a command prompt (cmd) or press Windows key + R and past it there

Disable new context menu

reg.exe add "HKCU\Software\Classes\CLSID\{86ca1aa0-34aa-4e8b-a509-50c905bae2a2}\InprocServer32" /f /ve

You will need to restart Explorer shell to take effect in both cases – or just restart Windows.

Restore new context menu

reg.exe delete "HKCU\Software\Classes\CLSID\{86ca1aa0-34aa-4e8b-a509-50c905bae2a2}" /f 

Now the easiest way to restart Explorer shell is to press Ctrl+Shift+Esc to open the Task Manager, then right-click Windows Explorer and select “Restart” to restart it.
restart explorer
Another alternative is to simply restart Windows.

How to add “Open Cmder Here” in context menu on Windows

Cmder is a powerful command-line interface (CLI) tool for Windows operating systems that aims to enhance the overall command line experience. It provides a comprehensive collection of Unix-like commands, as well as a customizable console emulator that supports multiple tabs and a streamlined user interface.

If you want to add Open Cmder Here in context menu on Windows in a chosen folder then this is what you need to do:

  1. Open a terminal as an Administrator. It can be cmder or Windows cmd, it doesn’t matter.
  2. Navigate to the folder you have placed Cmder. (where you keep cmder.exe file)
  3. Run this command : .\cmder.exe /REGISTER ALL

If you get an “Access Denied” message, make sure you are executing the command in an Administrator prompt.

In a file explorer window right click in or on a directory to see “Cmder Here” in the context menu. If you are on Windows 10 or 11 you probably wont see it immediately. You have to click “Show more options” first and then you will see it there.