So far we put all the code in one file. In previous example if we wanted to add more balls we would have to add several lines of code for every ball we add – like creating new bitmap, setting new position, anchor etc. Even the functions are written in a way that they call “ball” methods directly. How to avoid this and make it more universal, more reusable?
Classes & Instances
I will not go into details about Lua language but in short, Lua does not support classes the way that languages like C++, Java and ActionScript do. It has roots from prototype-based languages. In Lua, each object can define its own behavior through metatables so in a way we emulate OO programming and classes in Lua.
Creating instances is easy through a new function:
local sprite = Sprite.new()
local texture = Texture.new("image.png")
local bitmap = Bitmap.new(texture)
local timer = Timer.new(1000, 0)
Inheritance
It is through the inheritance that we can “emulate” the classes just like in other languages – they will have variables, methods etc. Then we put these classes into their own files and Gideros will load them automatically. We use the Core.class function to create our own classes through inheritance. We can inherit from Sprite, EventDispatcher and so on. Keyword self is the equivalent of the this pointer in C++ and it is a reference to the table which is created as part of the Class.new() command.
Here is a simple inheritance example:
Player = Core.class(Sprite) -- we create our own player class, inherited from the Gideros Sprite core class

--init() function is called automatically when we create(instantiate) new Player
-- it is like a constructor function
function Player:init()
-- do the initialization of Player instance,we set custom variables
self.health = 100
self.speed = 3
end

function Player:walk()
-- this is a Walk method of a Player class
	print("Player Walking - health:", self.health)
end

function Player:jump()
-- jump logic
end

newPlayer = Player.new() --create new Player instance
anotherPlayer = Player.new() --another Player instance
--we add both to stage
stage:addChild(newPlayer)
stage:addChild(anotherPlayer)

print (newPlayer.health)

--we call their methods
newPlayer:walk()
newPlayer.health = 50
anotherPlayer:walk()
As you can see, in the and it looks similar to OO in other languages. In above example we put all the code in main.lua but we could take all the (class,methods..) code (line 1-18) and put it in player.lua file and the rest we would leave in main.lua. This is what we will do in next example.
Now lets take the code from previous tutorial and turn it into what we learned today. First you create a ball.lua file. The code is pretty much copy/paste from or previous ball example except that we access variables and methods with self (it is also used instead of word ball). As you will see we use word self. I understand that we access class variables and class methods with self word but I am not so sure why we need to pass another self to self:addEventListener function (if you know let me know in comments, I am still learning). This self word is use everywhere so it can be quite confusing for beginners.
Put this in ball.lua (Code is commented):
-- create our own Ball class
Ball = Core.class(Sprite)
--init will run every time we create new Ball object (Ball.new)
function Ball:init (texture) --we will pass texture name
self.direction = 3
local bitmap = Bitmap.new(Texture.new(texture,true))
self:setPosition(math.random(0, 270),math.random(0, 430)) --put ball on random position on screen
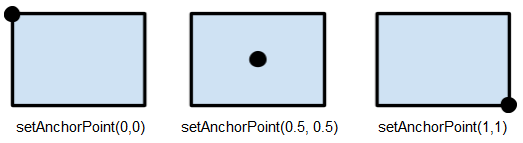
bitmap:setAnchorPoint(0.5,0.5)
self:addChild(bitmap)
self:addEventListener(Event.ENTER_FRAME, self.rotateBall,self)
self:addEventListener(Event.MOUSE_DOWN, self.changeBallDirection,self)
self:addEventListener(Event.MOUSE_UP, self.fallDown,self)
self:addEventListener(Event.MOUSE_MOVE, self.moveBall,self)
end
-- function rotating ball - executed every frame
function Ball:rotateBall()
self:setRotation(self:getRotation()+self.direction)
end
-- function scale ball - executed every mouse press
-- it is not actually mouse,it means no multi touch
function Ball:changeBallDirection(event)
if self:hitTestPoint(event.x, event.y) then
-- zoom the ball - jump up
GTween.new(self, 0.3, {scaleX = 2, scaleY = 2}, {ease = easing.linear})
soundJump:play()
self.direction = math.random(-20,20) --random rotation speed(left or right)
end
end
function Ball:fallDown(event)
if self:hitTestPoint(event.x, event.y) then
-- zoom the ball - jump up
GTween.new(self, 1.5, {scaleX = 1, scaleY = 1}, {ease = easing.outBounce})
soundBounce:play()
end
end
--move the ball
function Ball:moveBall(event)
if self:hitTestPoint(event.x, event.y) then
local dx = event.x - self:getX()
local dy = event.y - self:getY()
self:setX(self:getX() + dx)
self:setY(self:getY() + dy)
self.x0 = event.x
self.y0 = event.y
--not sure why this is here, maybe once we start moving ball
-- we don't need to check if the ball is moved?
event:stopPropagation()
end
end
Gideros will automatically load and run this file when you run the program. Now create main.lua, it will be much shorter and you will see how easy is to create new balls:
-- you can apply some settings to your entire application
application:setKeepAwake(true)
application:setScaleMode("letterbox") --proper "full screen" scaling for most devices

-- global direction variable,rotate counterclockwise -3
--direction = 3

-- load background image
local field = Bitmap.new(Texture.new("gfx/field.png",true))

-- load sound that will be played when we press on ball
soundJump = Sound.new("snd/jump.mp3")
soundBounce = Sound.new("snd/bounce.mp3")

-- here we create new ball instances,we pass texture name as argument
-- Ball.new will create objects that we defines in ball.lua
--ball2.png and ball3.png are just different balls - try using your own images
newBall = Ball.new("gfx/ball5.png")
newBall2 = Ball.new("gfx/ball2.png")
newBall3 = Ball.new("gfx/ball3.png")

--add field for background and all balls to stage
stage:addChild(field)
stage:addChild(newBall)
stage:addChild(newBall2)
stage:addChild(newBall3)
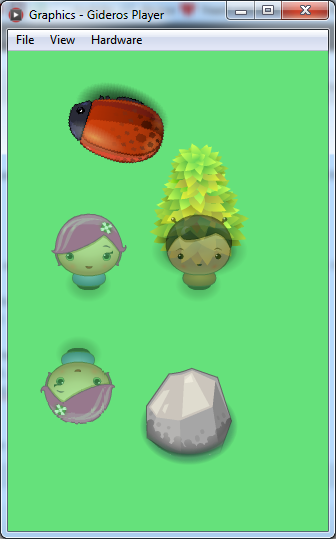
and that’s it. You can see it is much clearer this way and we only need to create new Ball objects and you will have new ball with all the methods and all. Try to add new balls and you will see them appearing on the screen and each ball can be picked up, dragged etc. You can create of course a lot of classes like this, for every object you want. If you had a football(soccer) game then we have the ball class already. Then you would for example create player.lua and put all logic for all players there – they all behave in similar way. You could create a goalie.lua and referee.lua class/file for goal keeper and referee if you want because they behave differently and have different logic than players (or you could use different methods in player.lua class, as you wish). If you had an active audience you can create audience.lua class etc. You don’t need to create these classes just for objects – you can also create it for example to handle all the audio effects in the game and so on.
Passing arguments to functions
We are currently just passing a texture file name to Ball class init() method and then randomly setting x and y but you can of course change this and pass x and y .
So in ball.lua you need to modify function init (I am only showing lines that need to be changed):
function Ball:init (texture,x,y) --2 new arguments
        --everything stays the same except
        self:setPosition(x,y) --explicitly set x and y
        --everything else is the same
end
and now we also change few lines in main.lua:
newBall = Ball.new("gfx/ball5.png",10,200)
newBall2 = Ball.new("gfx/ball2.png",200,40)
newBall3 = Ball.new("gfx/ball3.png",150,300)
This way you can create new ball at any position you wan’t. You can of course pass other arguments ,as many as you wan’t.