Installing / updating Composer dependencies is very slow or time outs

I wanted to speed up my coding by adding Laravel 4 Generators and Laravel Artisan plugin for Sublime text 2 (you can learn more about this here). I added "way/generators": "dev-master" to my composer.json file as instructed and ran "php composer.phar update" and waited….and waited…and waited. How can downloading simple text files be so slow when I have very fast connection?

For some reason I always had problems with composers speed – installing or updating dependencies was very slow. By searching net I saw that a lot of people have similar problems and various solutions are offered – for some they work and for some they don’t. I would advise you to try them out and see if any of them help you.

One of the most common advices is to use the --prefer-dist switch:

php composer.phar update --prefer-dist

I ran it however it didn’t help me. Composer got stuck on updating symfony/filesystem dev-master. After 5 minutes I got this error:

[Symfony\Component\Process\Exception\RuntimeException]
The process timed-out.

After trying it few times with the same result I realized that git.exe was having some problems with my network (not sure what). So the problem seems to be with Git protocol, at least in my case. Composers default github-protocols config settings is ["git", "https", "http"]. So what I did was changed github-protocols to https with this command:

php composer.phar config -g github-protocols https

I ran the update again and it started working, much faster and no timeouts.

Note: I don’t know if this was due to me canceling composer updates several times but after composer finished updating I got this error for the first time :

Fatal error: Call to undefined method Illuminate\Foundation\Application::getConfigLoader()

The solution for this can be found here.

Google Sync Turned Off on my Android! How do I turn on Google Sync?

Yesterday I noticed that all my Google services were not being synced on my Nexus 7 (Android 4.2.2) anymore. Emails were not automatically downloaded, Calendar,Chrome, contacts etc were not updating. On top of that I was getting weird “Sync was unsuccessful” (or something like that) messages on my PC’s browser. Sure enough – sync was turned off on my Android tablet. For some reason option “turn on sync” is not easily accessible or at least not where you would expect it. If you go to Settings -> accounts then you will only be able to manually sync those accounts but not turn it on.

To turn on auto sync you have to go to

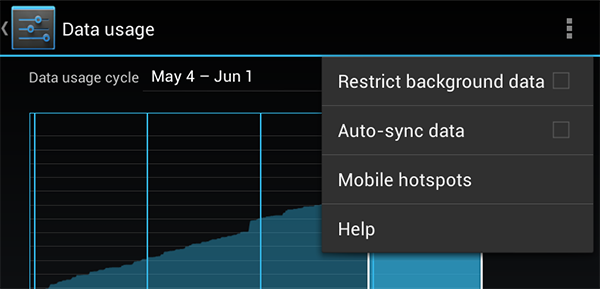
Settings -> Data usage -> Menu (top right corner, 3 small squares) -> check Auto-sync data

Here is the screenshot of the Menu:
turn on google sync auto-sync

How to remove horizontal scrollbar in Twitter Bootstrap tab function

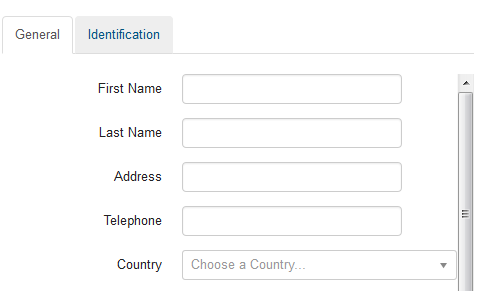
While building my new admin/CMS with Laravel 4 and Gebo Admin (really cool twitter bootstrap responsive admin template) I encountered weird problem while using bootstrap tabs –  after I added “enhanced select” (Country dropdown) suddenly a horizontal scroll bar appeared!

How to remove horizontal scrollbar in tab function twitter bootstrap

I am not sure if this is 100% best solution (I am not that keen on digging into all this .js stuff) but the easiest way to fix this is to open Bootstrap.min.css, search for .tab-content and then replace

overflow: auto;

with

overflow: hidden;

Reload your page and the horizontal scrollbar is gone.

Enable Gmail Tabs – Tabbed Inbox

Gmail’s inbox Tabs are a very cool new Gmail feature that brings order to your inbox.

gmail inbox tabs

To enable it, click the gears button and try to find “Configure inbox”.

tabs inbox gmail

Click on “Configure inbox”, select the tabs that you wish to enable,click Save and you can now use the new feature.  In case you do not see “Configure inbox”, check back later.

ReflectionException: Class SomeClass does not exist – Laravel 4

Note: This post was written while Laravel 4 was still in beta.

When you add a new class (controller) in Laravel 4 you will most probably get

ReflectionException: Class SomeClass does not exist

SomeClass is of course the name of your new class.

Why does this happen? The file/controller is there, the class is there – it works in Laravel 3 so why doesn’t it work in Laravel 4?

The reason for this is that because of the performance reasons Laravel 4 (beta) has a static list of all classes that need to be autoloaded. Since you added your new controller Laravel doesn’t know about it yet. Hopefully this will be automated in the future but right now what you need to do is open your command prompt and type this (on Windows):

 >composer dump-autoload

If you get 'composer' is not recognized as an internal or external command error or Could not open input file: composer then use this version (also go to your project directory where composer.phar is located):

 >php composer.phar dump-autoload

Composer will (re)generate autoload files and your new controller will work.

Always displays battery icon in windows 7 system tray

How to move an icon (in my case I wanted to move battery icon) from that “hidden” system tray space so it will always be visible in system tray?

Simple, just click on the up arrow to display that “hidden” system tray area, grab the icon (hold the left mouse button) you would like to move and just move it to  the always-visible system tray area.

system tray windows 7
Pic: System tray on windows 7

Special message for P: this is to confirm my affiliation with the website – as requested by chat support

‘git’ is not recognized as an internal or external command

If you installed Git from windows.github.com you might get this error while running ‘git’ from windows command prompt(cmd):

‘git’ is not recognized as an internal or external command, operable program or batch file.

What you need to do is add Git path to Windows Environment Variables.

First, search for git.exe with windows search. You will find it in directory similar to this one:

C:\Users\user\AppData\Local\GitHub\PortableGit_76ds5d7f65adsf76as5f7as6f5asdf\bin

Add this to Windows Environment Variables :

  • right mouse-click “My Computer” and select “Properties”
  • if on Windows 7 then click on “Advanced system settings”,
  • open “Advanced” tab and click “Environment Variables”,
  • highlight/click on the “Path” variable under “System variables” and click “Edit”,
  • add your specific path to front of “Variable value” field or at the end, separated by a semicolon from the existing entry. Do not add a space between ; and last entry.Also, do not add ; after the last entry

Let say, just for example, that the Git.exe is in C:\Users\something\somefolder\bin folder. So when you edit your path variable it should look like this (thanks to my super Photoshop skills you can see that we are on Advanced tab, that we are editing Path variable and that I excel at making watermarks):

edit system variable git

Click Ok few times and try running Git again.

Warning: file_get_contents(): Unable to find the wrapper “https” – did you forget to enable it when you configured PHP?

I was installing Composer via CLI terminal for a new Laravel project and got this error:

Warning: file_get_contents(): Unable to find the wrapper “https” – did you forget to enable it when you configured PHP? in Command line code on line 1

The solution is easy: Open php.ini file (mine is located in xammp/php/php.ini ) and add (or uncomment) extension=php_openssl.dll in the list of Dynamic Extensions. Restart Apache and it should work.

Laravel Redirect redirects URL to index.php

One of the first things that I do when I start using a new framework (CodeIgniter, Laravel etc) is to remove the default index.php from the URL.

When you install Laravel and you want to remove index.php from the URL simply do this (If you are using Apache, make sure that mod_rewrite is enabled):

Create .htaccess file in your public directory and add this:

<IfModule mod_rewrite.c>
     RewriteEngine on

     RewriteCond %{REQUEST_FILENAME} !-f
     RewriteCond %{REQUEST_FILENAME} !-d

     RewriteRule ^(.*)$ index.php/$1 [L]
</IfModule>

Many developers do this and forget that there is another step. Everything works fine until you use Laravel’s Redirect class, for example:

return Redirect::to ('someurl'); 

This redirects you to index.php/someurl instead of someurl.

What you need to do is to open application/config/application.php file and you will see this on the line 42:

'index' => 'index.php'

Remove index.php so it becomes

'index' => ''

Save the file and now you have a cleaner, nicer URLs without the index.php.

How to embed styled tweets in your posts or pages

A lot of people don’t know that there is an easy way to embed tweets on your site with all the formatting and styling so they look just like on twitter.com. In addition, tweet will also contain avatar, reply,favorite,follow and other buttons so it is also functional.

For example look at this embedded tweet:

Looks nice, doesn’t it? Good news is that it is very simple but you need to go to twitter.com and follow these steps:

1. When you see a tweet in your stream that you would like to embed simply click on the date (when the tweet was posted) link – in our example above that link/date is “22 Mar 06”.

2. When the tweet is displayed click on the “Embed this Tweet” link and pop-up box will appear.

3. Copy the entire HTML code and paste it into the source (HTML) code of your page anywhere you want (inside body tag).

This is how the code for above tweet looks like:

<blockquote class="twitter-tweet">
<p>just setting up my twttr</p>&mdash; Jack Dorsey (@jack) 
<a href="https://twitter.com/jack/status/20" data-datetime="2006-03-21T20:50:14+00:00">March 21, 2006</a>
</blockquote>
<script async src="//platform.twitter.com/widgets.js" charset="utf-8"></script>

Keep an eye on this line :

<script async src="//platform.twitter.com/widgets.js" charset="utf-8"></script>

This JavaScript,which is fetched from twitter website, makes your tweet embed look all nice like in our example above. If you forget to copy it your embedded tweets will not be styled properly.

If you embed only one tweet per page then you can include this line after blockquote. If you embed several tweets then include this line only once, somewhere at the bottom of the page or inside meta tag.