Disable This app is preventing shutdown message in Windows 11/10

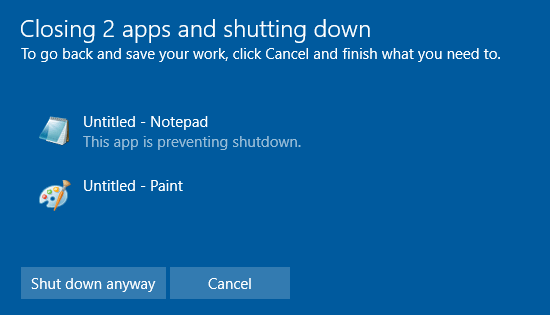
This is one of the more annoying features of Windows since forever. You restart or shutdown PC, only to be greeted with this kind of message:

Even worse, Windows is saying it is closing apps but many times it never closes them. Countless times I did a shutdown, went away (or even left it overnight) much later and this wwindow was still on!

I get it, this is suppose to prevent us losing some important work but I cant remember when I needed this. Even if you click Cancel it will shutdown sometimes.

Unfortunately, Microsoft doesn’t provide an easy solution/checkbox in settings. Here is how to fix it. You will need to edit registry but it is not hard.

Important: Please only do this if you know what you are doing. Call someone who knows if you don’t. You can mess up Windows if you do something wrong in Registry. I cant be responsible if something goes wrong. Thank you for understanding 🙂

1. Open registry editor.

Click on Start Menu or Search icon and just type “registry” then click on registry editor app. If Windows asks you for permissions just click YES.

2. Navigate to (open):

Computer\HKEY_CURRENT_USER\Control Panel\Desktop

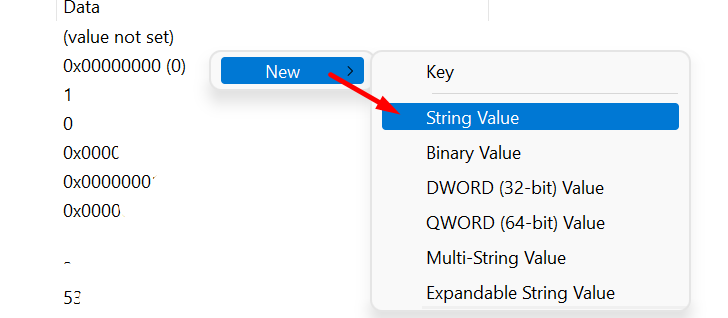
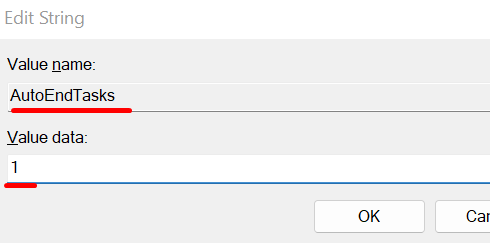
3. In the right panel, right click the empty space and choose New > String. and name it AutoEndTasks. That is important, it has to be named exactly like this.

4. Double click newly created AutoEndTasks (REG_SZ) and set its Value data to 1.

Click OK, close Registry editor, restart Windows.

Note: When you restart Windows after what you just did, you might still get this annoying notice “This app is preventing shutdown message” because Windows has not yet reloaded Registry. Next time you restart or shutdown Windows you should not see this message.

If this doesn’t work, try creating DWORD Value in step 3. For me, DWORD Value didn’t work. Only after I created String value it worked.

Laravel Composer using the wrong PHP version

I installed WAMP for offline development, then Composer and then Laravel. Everything was OK until I used Composer to download some Laravel package and I got this kind of error:

This package requires php >=7.0.0 but your PHP version (5.6.25) does not satisfy that requirement

Number don’t matter but I needed newer PHP. OK, I changed PHP version on WAMP, restarted it..and Laravel composer gave me the same error!

Long story short, after an hour of googling and trying all the suggested solutions like editing composer.json and this and that, nothing worked!

The solution is simple: reinstall Composer! D’oh!

When you run setup you can select the PHP version you want Composer to use (of course you have to have this PHP version installed on your PC or server) and the Composer will use it from then on:


laravel composer php version

After doing this this I was able to install the package. To be honest, I was quite upset that so many people offered some complicated solutions (that didn’t even work for me) on various forums and wasted my time when the solution was so simple.


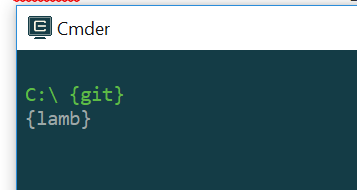
Cmder displays {lamb} and {git} instead of λ and current dir

I recently installed cmder for Windows and when I ran it it was displaying {lamb} and {git} instead of λ and current dir.

Cmder displays {lamb} and {git} instead of λ and current dir

It came with the 0.4.2 version of Clink , which apparently is incompatible or doesnt work best with Windows 10.

Solution is very simple:

1. Go to https://mridgers.github.io/clink/ and download ZIP version of  Clink (.exe is probably OK too but I downloaded ZIP). The new version I downloaded was 0.4.9.

2.  Go to the cmder_mini/vendor folder (where you installed cmder) and rename clink folder to something like clink_original (or you can delete it if you like but I prefer to backup first if something goes wrong) and recreate a folder named clink  and simply extract all files from the downloaded ZIP to this folder.

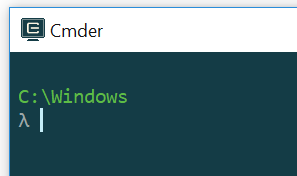
3. Close (if you had it open) and restart cmder and this is what you should see:

cmder clink

Prevent Windows from updating/reinstalling a driver

This is for Windows 10 but will probably work on other Windows versions too.

Windows 10 is still relatively new so some vendors (looking at you Lenovo) haven’t updated the drivers. For example in my case I had problems with Conexant driver for Windows 10 – microphone didn’t work in some programs. To make the long story short, I tried everything and the solution was to uninstall the driver and use older version. The problem was, Windows 10 kept reinstalling the latest driver!

The solution was this: Install Microsoft tool that “hides” specific driver form Windows so Windows doesn’t “see” it and doesn’t update/reinstall it.

So:

  1. Uninstall or rollback the problematic driver until you have the one that works.
  2. Download this tool:
    Note: I am linking to Microsoft site and not directly to file download so you can be sure that there isn’t some virus or some malware file on the link.
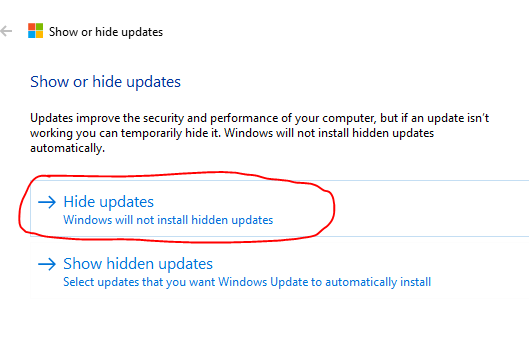
  3. Click Hide Updates, like on photo below.hide updates windows
  4. You will see a list of drivers. Select the driver you want to hide from Windows update and Windows will not update this driver anymore. Click next, wait and that’s it.

If you want Windows to update the driver again, the run this tool again and select “Show hidden updates” and then remove the hidden driver.

Fix Missing Volume Icon in Tray in Windows 10

I’m liking Windows 10 but it has a lot of bugs that make it look like it is still a beta software. One of the most annoying bugs is that the volume icon simply disappears (this usually happens to me when windows 10 wakes up from sleep). Even restarting doesn’t always help. Here is a weird solution I found (which is still just temporary solution but it beats restarting). Going to Notifications & Settings then “Turn system icons on and off” doesnt help because Volume option is greyed out.

This is what helped. When the volume icon goes missing do this:

1. Click on search icon (near start menu) and type “display”.

2. Click “Display settings”

3. Change the size of text to 125% and click apply.

4. Do not log out!

5. Change the text size back to 100% and click apply.

6. Now sign out and then sign back in.

For some weird reason the volume icon is back! Hopefully it works for you too. This (setting text size) might mess up your desktop icon alignment a little but it is not really a problem.

Where are Desktop Viber Avatars located on PC?

If you want to see all the avatars / photos that your Viber contacts use for avatars (even old ones) then you can find big sized images here (this is only for Windows):

DRIVE:\Users\YOUR WINDOWS PROFILE\AppData\Roaming\ViberPC\YOUR PHONE NUMBER\Avatars

so for example if your drive is C, your windwos profiel is FooUser and your phon is 555-55555 then you can find it here:

C:\Users\FooUser\AppData\Roaming\ViberPC\55555555\Avatars

Note: The files might not have standard photo extensions (jpeg,png,.) so might not be able to open them with double clicking on them – but they are still photos. So just drop them into your favorite photo viewer or even better: browse that path with your photo viewer’s explorer.

Start Menu Search Remains Empty in Windows 10

I installed Windows 10 and after some time search in start menu stopped working. No matter what I typed in, the menu remained empty and the small dots going from left to right (search progress animation) just kept moving and nothing showed.

This is how to solve it: open Task manager (press CTRL + SHIFT + ESC), go to Details tab (If you don’t see it there then check Processes tab) and stop Cortana or SearchUI.exe. Just right click on the task then select End Task. After you end Cortana try searching again.

How to pin shortcut or a batch file to Windows 7 Taskbar?

I installed (in this case just extracted files to some folder) great Windows console replacement caled Cmder. When you want to run it you click on Cmder.bat file. I added it to my PATH system variable but I also wanted to pin it on my taskbar. I was quite surprised when I kept dragging the icon to my taskbar and Windows 7 didn’t offer me “Pin to taskbar” option! What gives?

Apparently you can’t pin shortcuts or a batch file to the new Windows 7 Taskbar.

So here is a quick workaround. Let say you extracted it to the folder C:\cmder\Cmder.bat

  1. Open the folder, right click on Cmder.bat file and select “Create shortcut”.
  2. Right click on newly created shortcut and select properties.
  3. Target: input box will contain this text: C:\cmder\Cmder.bat. Replace it with C:\Windows\System32\cmd.exe /C "C:\cmder\Cmder.bat". Don’t forget the quotes.

Save it and now you can drag it to your taskbar 🙂

Again, my Cmder is in C:\cmder\Cmder.bat folder. If you put yours in different folder you have to use your folder in step 3.

Create a WiFi hotspot in Windows 7 and share Internet connection

If you don’t have WiFi router you can still share your internet connection via your PC. I was using connectify.me software and it did the job but it felt bulky,it disconnected at random times (free version) and my laptop fan was on full speed all the time,which was slowing down my PC. I was very surprised when I learned how easy it is to do it by yourself (on windows 7 at least). All you need to do is enter few commands and enable ICS and that’s it! What is great is that you can use this connection with your Nexus 7 or any other smartphone.

1. Click Start and type cmd, then right click cmd.exe and select “run as Administrator”:
cmd run as administrator

2. Run this command (I used “My net” as SSID and “elcoderino” as pass so replace it with your values)

netsh wlan set hostednetwork mode=allow "ssid=My net" "key=elcoderino" keyUsage=persistent

This will create “Microsoft Virtual WiFi Miniport adapter” and will also set up your hostednetwork. Now you need to enable Internet Connection Sharing (ICS) or Network Bridging for this new adapter (don’t worry, it is just few clicks. I enabled ICS connection but you can also bridge networks)

3. Now you simply start or stop new hosted network with these commands (please keep in mind that cmd.exe needs to be “run as administrator” – check step 1)

// to start hostednetwork type
netsh wlan start hostednetwork
// to stop hostednetwork type
netsh wlan stop hostednetwork 

and that’s it! You should now have a working WiFi hotspot! Try connecting with your smartphone or tablet. Why install or even pay for the software when you can have it with few simple steps?