Fatal error: Unparenthesized `a ? b : c ? d : e` is not supported in DatabaseInterface.php on line 615

You will get this error when you upgrade your PHP 7 to PHP 8 (or even 7.3 to 7.4 or something like that) but keep your old phpmyadmin version. This error can be in any code but in our case it is in phpMyAdmin\libraries\classes\DatabaseInterface.php file so we need to fix it for phpMyAdmin. We will not fix the code itself because in this case it is not needed.

The solution here is for Laragon. It is a little longer, but easy, Laragon oriented solution so you can better understand how it works. Scroll down to the end to do this manually (faster).

Laragon solution

It is possible that your Laragon came with older phpMyAdmin version. So we will tell Laragon to download the latest one.

Open your {INSTALLATION_PATH}\laragon\etc\apps\phpMyAdmin folder. Just in case, backup this phpMyAdmin folder first. Then delete all files in it so the folder is empty.

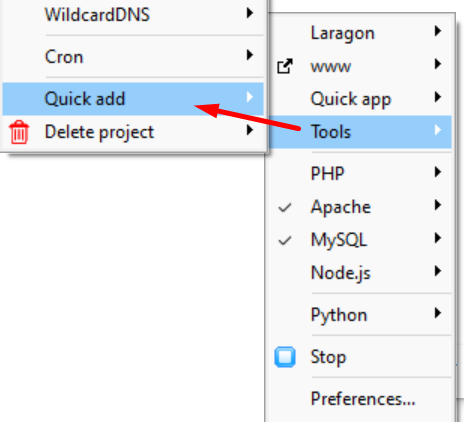
Right click the laragon tray icon, then Tools then Quick add and then Configuration…

laragon options configuration quick app

this will open packages. conf file in your text editor. Find this line :

# phpMyAdmin
phpmyadmin= *******

of course you will see a link to phpmyadmin download page. It will pobably be link to a specific version.

Change it to this (latest version of phpmyadmin) and save the file.

# phpMyAdmin
phpmyadmin=https://www.phpmyadmin.net/downloads/phpMyAdmin-latest-all-languages.zip

Note: if the second line starts with # you need to delete the # character.

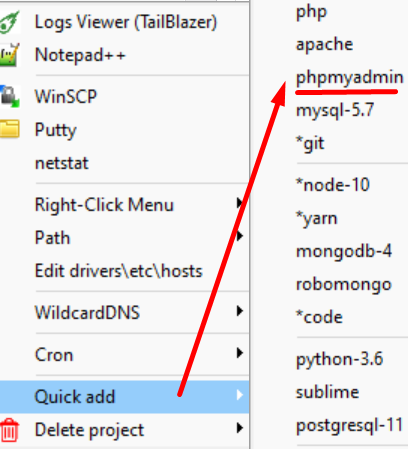
Right click the laragon tray icon again, then Tools then Quick add and then phpmyadmin… and Laragon with automatixally downlaod the latest phpMyAdmin and install it.

laragon phpmyadmin

Restart Laragon, open yourproject.test/phpmyadmin/ in your browser (your project will be called different than yourproject.test) and phpmyadmin should work.

Manual solution

1. backup and then delete all files in {INSTALLATION_PATH}\laragon\etc\apps\phpMyAdmin folder
2. Download the latest version of phpMyAdmin from https://www.phpmyadmin.net/downloads/
3. Extract the content of downloaded ZIP file into a empty phpMyAdmin folder
4. Restart laragon and phpMyAdmin should work.

Disable Google Lens search in Chrome

this will be a short one but it is quite annoying one: Google Chrome keeps making Lens as default image search in Chrome after every few updates (not often). It is used when you right click an image on internet and select “Search image with Google”. Here is how to turn lens off:

Open a new tab and go to chrome://flags.

Search and locate the following flag: Enable Lens features in Chrome. From the drop-down, select Disabled

You need to relaunch Chrome and problem solved.

Google Drive is almost empty but shows several GB used

I guess you cant blame Google for trying to sell extra storage but this problem was really annoying me for a long time. Google kept telling me my account is full and it showed ~7GB in Google Drive. When I clicked on Drive icon there were just few files in it, totaling less than 1MB! No matter how much I kept clicking, files just weren’t there. Trash and everything else was empty. Of course on every page there was an offer for buying additional storage.

Well, finally I found what is clogging my drive: it was hidden app data, more specifically from chat app that drive was also backed up. I wish Google would tell me this, but of course it is in their interest to try to make us use pay for exra space.

How to see what is clogging up your drive (desktop):

1. Visit https://drive.google.com/ from your PC.

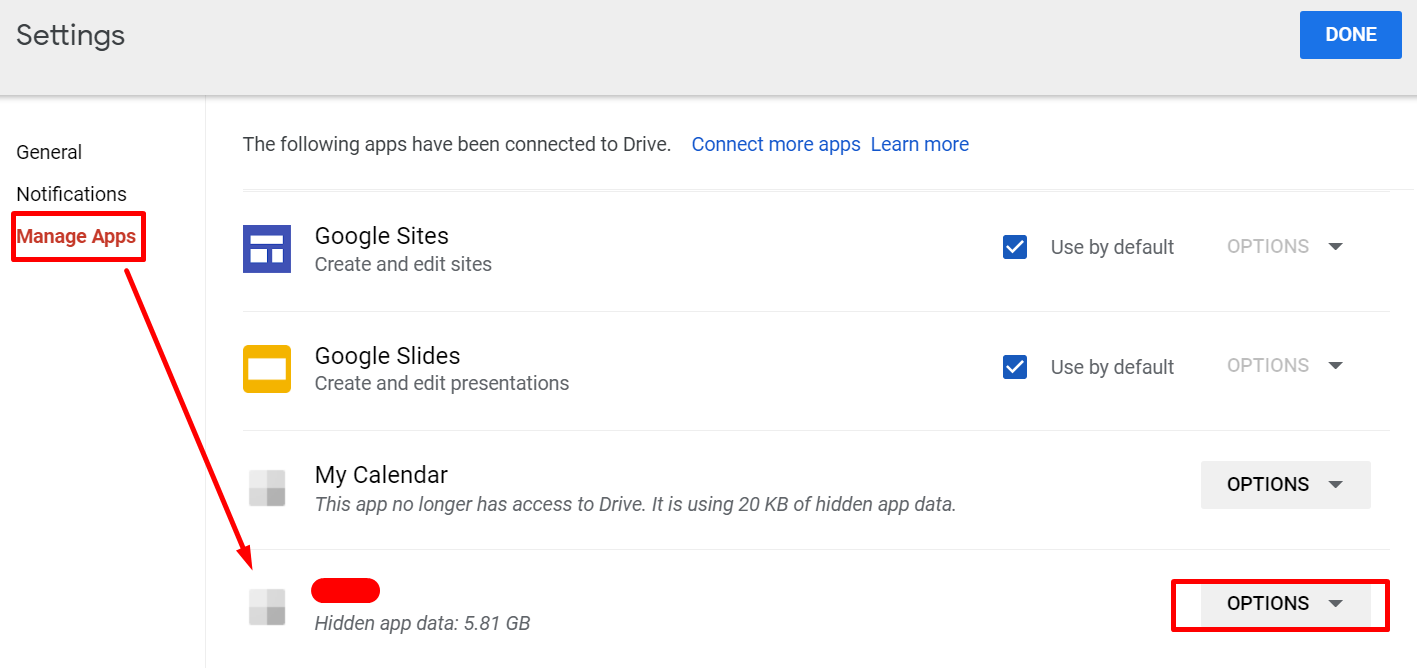
2. Click the gears icon and select Settings

Scroll down and you will see if an app is keeping hidden files in your drive. In my case it was chat app (I hid the name). If you see few GB of hiden app data then this is the answer to what is clogging up your Drive.

Important: I am not 100% sure what this data contains or if it is just a backup. If you are not sure what you are doing then do NOT delete the app data. I cant take any responsibly if those disappear. So I am not going to tell you how to gain back space, just that this is how I found out WHY my drive is full. This way you know what is the problem is so maybe deleting old photos and videos (or even clean or redo a backup) from your app on your phone will also delete it from drive.

Find the WiFi Password in Windows 10 Using CMD

Every time I search for this I get pages long articles with 99% of babbling when the solution is 2 lines. I think it can be used for Windows 7, 8, 10, 11,…

NOTE: you must have connected and stored password for that wifi in the past. This trick is to see password that is already stored on your computer (in case you forgot it), NOT to find out password on router for any wifi.

So here is how to do it:

Open CMD (some say in administrator mode but for me it worked OK without it too).

Type (can be small letters) NETSH WLAN SHOW PROFILE

You will get a list of all Wi-fi networks. Let say the name of network you want is MYWIFINET.

Type NETSH WLAN SHOW PROFILE MYWIFINET KEY=CLEAR

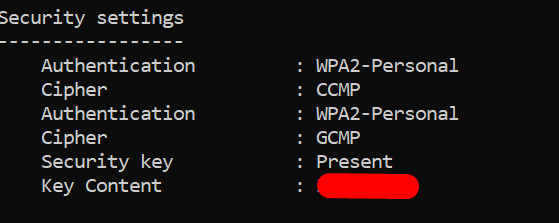
Scroll down to Security Settings and find Key Content (I hid my password with red color).

Next to it is the wifi password you are looking for.

Windows 11: Is my PC compatible? How to check TPM requirement

There was quite a buzz on internet after Microsoft announced new Windows 11 and apparently lots of PCs will be unable to upgrade due to “incompatible hardware” or not meeting the Windows 11 requirements. This will probably change due to backlash but one of those requirements is Trusted Platform Module (TPM) 2.0, (or some say 1.2).

To check what version of TPM you have simply click on the windows search icon (or press Win-R to open run console) and type tpm.msc and press enter.

New windows will open, called Trusted Platform (TPM) Module Management. Check if TPM is ready for use and what version of TPM do you have. If you have 2.0 then this requirement is met.

Trusted Platform Module (TPM) 2.0 Management

Microsoft had an PC Health Check app to tell you if your PC meets requirements but they puilled it to update it.

Unity Corgi Engine PixelPerfectCamera.cs error

I bought the latest Corgi Engine Package and tried to import it using latest version of Unity: 2019.3.2f1

After package was imported successfully I was unable to run some demoes because I got these errors:

Library\PackageCache\com.unity.2d.pixel-perfect@1.0.1-preview\Runtime\PixelPerfectCamera.cs(168,13): error CS0234: The type or namespace name ‘PixelPerfectRendering’ does not exist in the namespace ‘UnityEngine.Experimental.U2D’ (are you missing an assembly reference?)

Library\PackageCache\com.unity.2d.pixel-perfect@1.0.1-preview\Runtime\PixelPerfectCamera.cs(173,13): error CS0234: The type or namespace name ‘PixelPerfectRendering’ does not exist in the namespace ‘UnityEngine.Experimental.U2D’ (are you missing an assembly reference?)

Luckily, the problem is not with Corgi Engine but Unity – you need to update the PixelPerfectCamera package.

Go to (menu) : Window->package manager in menu and update the PixelPerfectCamera package.

2D pixel package update

This will fix the fatal errors.

Gideros Mobile Tutorial 6: Fun with Events

This is a continuation of a previous tutorial. We will add some more effects in this one and we will also learn how to use some existing libraries. The entire lesson with all needed files can be downloaded here. You can use your existing main.lua file from previous tutorial or you can start new one.

Ok, so we have a rotating ball that listens to ENTER_FRAME (rotates the ball every frame) and MOUSE_DOWN (changes rotation) events. Now lets add two more events to make this “game” more interactive. We will add MOUSE_UP and MOUSE_MOVE. MOUSE_MOVE will be used when we move the ball (by holding down the finger on screen) and MOUSE_UP will be used (triggered) when we let the ball go (lift the finger off the screen). We will also use another (Lua) library called GTWeen and the easing effects.

Instead of just dumping entire code I will be pasting part by part. These parts form main.lua file.

Part one: Everything is the same like before except that we load another soundfile that will be used as a ball bouncing when we release it.

-- you can apply some settings to your entire application
application:setKeepAwake(true)
application:setScaleMode("letterbox") --proper "full screen" scaling for most devices

-- global direction variable,rotate counterclockwise -3
direction = 3

-- load the textures and create bitmap objects
--2nd texture parameter can be set to true to get anti-aliasing
local field = Bitmap.new(Texture.new("gfx/field.png",true))
local ball = Bitmap.new(Texture.new("gfx/ball5.png",true))

-- load sound that will be played when we press on ball
local soundJump = Sound.new("snd/jump.mp3")
local soundBounce = Sound.new("snd/bounce.mp3")

-- set the anchor point in the center of ball so we can rotate it
ball:setPosition(120,150)
ball:setAnchorPoint(0.5,0.5)

part 2: First, we added a GTween tween to changeBallDirection function.If you used Flash then you know what tweens are but basically it is an animation that is generated between 2 frames we specify.The term tween comes from the words “in between”. Example: We give GTween starting and ending frame of a object and GTween will create a transition. It can be moved from/to, it can be scaled from/to etc.

GTween.new(ball, 0.3, {scaleX = 2, scaleY = 2}, {ease = easing.linear})

What this does is it takes the ball object and scales both x and y times 2 in 0.3 seconds and using the easing.linear effect. Second, we create a new function that will move the ball as we slide the finger on the screen while still holding it. I’m not going to explain the mathematics of this except that we get ball coordinates with getX() & getY() and we set them with setX() & setY().

Here is the full code of part 2:

-- function rotating ball - executed every frame
function rotateBall(event)
	ball:setRotation(ball:getRotation()+direction)
end

-- function scale ball - executed every mouse press
-- it is not actually mouse,it means no multi touch
function changeBallDirection(event)
	if ball:hitTestPoint(event.x, event.y) then
		GTween.new(ball, 0.3, {scaleX = 2, scaleY = 2}, {ease = easing.linear})
		soundJump:play()
		direction = math.random(-20,20) --random rotation speed(left or right)
	end
end
--move the ball
function moveBall(event)

	if ball:hitTestPoint(event.x, event.y) then
		local dx = event.x - ball:getX()
		local dy = event.y - ball:getY()

		ball:setX(ball:getX() + dx)
		ball:setY(ball:getY() + dy)
		ball.x0 = event.x
		ball.y0 = event.y

		event:stopPropagation()
	end
end

Part 3: here will just attach event listeners that will call specific functions.

-- rotateBall function will be called on every frame change
ball:addEventListener(Event.ENTER_FRAME, rotateBall)
-- when we click on the ball it will change rotation and "jump" up
ball:addEventListener(Event.MOUSE_DOWN, changeBallDirection)
-- when we move the mouse then ball also moves
ball:addEventListener(Event.MOUSE_MOVE, moveBall)

Part 4: As you see the way we always create event is that we first write a function that does what we want and then pass it as a second argument to addEventListener function. You can also do it with anonymous function, especially if what the function does is in one or two lines so you don’t end up creating tons of strange named functions. Below we add Event.MOUSE_UP to ball:addEventListener but instead of passing function name as second parameter we create anonymous function and put the entire code there. In our case we use another GTween effect that returns the ball to starting scale 1 in 1.5 seconds but this time it uses outBounce easing effects so it looks like the ball is bouncing.

ball:addEventListener(Event.MOUSE_UP, function(event)
if ball:hitTestPoint(event.x, event.y) then
	soundBounce:play(30)
	GTween.new(ball, 1.5, {scaleX = 1, scaleY = 1}, {ease = easing.outBounce})
	end
end
)
stage:addChild(field)
stage:addChild(ball)

Try this and if you did everything correctly you should see a spinning ball. Now press AND hold the ball with your finger and the ball will scale to 2 times size in 0.3s .Drag it around and the ball will follow you. Now release it and it will fall down in 1.5s using outBounce effects 🙂 Isn’t that great? We can almost call it a game (if the goal of the game is to die of boredom moving the ball around ;).

Play with it a little, change GTween easing effects, maybe change graphics,sound effects..

Note: You can read more about GTween and it’s easing effects here. There are few “glitches” in the code – I used some random sound for bounce so it is not synchronized and also if you tap the ball too fast then the effect will fail because it will try to start new tween before it finished old one. Just ignore it for now.

SyntaxHighlighter Evolved Lua Brush (Language) for WordPress

If you need to add Lua support for WordPress SyntaxHighlighter Evolved plugin then here is one way:

Download this ZIP file. It contains 2 files:

  • shBrushLua.js – Lua Brush file
  • shBrushLua.php – WordPress plugin

Extract these 2 files and use FTP to navigate to your plugins folder (usually /public_html/wp-content/plugins), create new directory, for example syntaxhighlighter-brushes, and upload these 2 extracted files.

Go to WordPress admin -> Plugins -> Installed Plugin and activate “SyntaxHighlighter Evolved: Lua File Brush”,

Now you will be able to use Lua language with this code:

[lua]
— some Lua code here
print “Hello World!”
[/lua]

and it should display something like this :

-- some Lua code here
print "Hello World!"

Create a WiFi hotspot in Windows 7 and share Internet connection

If you don’t have WiFi router you can still share your internet connection via your PC. I was using connectify.me software and it did the job but it felt bulky,it disconnected at random times (free version) and my laptop fan was on full speed all the time,which was slowing down my PC. I was very surprised when I learned how easy it is to do it by yourself (on windows 7 at least). All you need to do is enter few commands and enable ICS and that’s it! What is great is that you can use this connection with your Nexus 7 or any other smartphone.

1. Click Start and type cmd, then right click cmd.exe and select “run as Administrator”:
cmd run as administrator

2. Run this command (I used “My net” as SSID and “elcoderino” as pass so replace it with your values)

netsh wlan set hostednetwork mode=allow "ssid=My net" "key=elcoderino" keyUsage=persistent

This will create “Microsoft Virtual WiFi Miniport adapter” and will also set up your hostednetwork. Now you need to enable Internet Connection Sharing (ICS) or Network Bridging for this new adapter (don’t worry, it is just few clicks. I enabled ICS connection but you can also bridge networks)

3. Now you simply start or stop new hosted network with these commands (please keep in mind that cmd.exe needs to be “run as administrator” – check step 1)

// to start hostednetwork type
netsh wlan start hostednetwork
// to stop hostednetwork type
netsh wlan stop hostednetwork 

and that’s it! You should now have a working WiFi hotspot! Try connecting with your smartphone or tablet. Why install or even pay for the software when you can have it with few simple steps?

Share localhost over the internet with ngrok

One of the more annoying things when developing on your local computer is that your clients or friends can’t see what you develop. You can upload it on your web server or you can work directly on the web server but that is inconvenient and slow. So I was very happy to discover this great tool called ngrok. There are similar tools (localtunnel etc) but this one is really easy to use.

Who is your daddy and..no..wait..what is ngrok and what does it do?

Ngrok is a cool little program that creates a tunnel from the public internet (http://subdomain.ngrok.com) to a port on your local machine. You can give this URL to anyone to allow them to try out a web site you’re developing without doing any deployment. Of course your local server has to run at the time of sharing but that is not a problem – you just leave your PC on.

How do I run this ngrok?

With ngrok it is super simple to expose a local web server to the internet. On Windows you just download ngrok.exe, unzip it some folder and then in command prompt (cmd) you just tell ngrok which port your web server is running on.

This is the most simple way (This opens port 8080 on your local machine to the internet). Type this in your command prompt:

ngrok 8080

You will see something like this :

Tunnel Status                 online
Version                       0.11/0.8
Protocol                      http
Forwarding                    http://345355bc.ngrok.com -> 127.0.0.1:8080
Web Interface                 http://localhost:4040
# Conn                        0
Avg Conn Time                 0.00ms

Of course the port (in this case 8080) has to be the port that your localhost is running on. Now just give the generated URL (in our example http://345355bc.ngrok.com) to your client or friend and let them test out your application.

You can do a lot more with ngrok, like inspecting your traffic, XML/JSON syntax checking, replaying requests, requiring passwords to access your tunnels, accessing your tunnels over HTTPS, forwarding non-HTTP services, forwarding to non-local services and more.

Check out ngrok here.