Find the WiFi Password in Windows 10 Using CMD

Every time I search for this I get pages long articles with 99% of babbling when the solution is 2 lines. I think it can be used for Windows 7, 8, 10, 11,…

NOTE: you must have connected and stored password for that wifi in the past. This trick is to see password that is already stored on your computer (in case you forgot it), NOT to find out password on router for any wifi.

So here is how to do it:

Open CMD (some say in administrator mode but for me it worked OK without it too).

Type (can be small letters) NETSH WLAN SHOW PROFILE

You will get a list of all Wi-fi networks. Let say the name of network you want is MYWIFINET.

Type NETSH WLAN SHOW PROFILE MYWIFINET KEY=CLEAR

Scroll down to Security Settings and find Key Content (I hid my password with red color).

Next to it is the wifi password you are looking for.

phpMyAdmin – Some errors have been detected on the server!

If you are getting this pop up warning

Some errors have been detected on the server! Please look at the bottom of this window.

phpmyadmin error

while using phpMyAdmin then the easiest way to stop this window popping up all the time is to disable this kind of error reporting.

First open the file /etc/phpmyadmin/config.inc.php.

then add/modify (or uncomment) the following line so you end up with this line:

$cfg['SendErrorReports'] = 'never';

Save it, restart MySQL or web server and the error message should be gone.

Windows 11: Is my PC compatible? How to check TPM requirement

There was quite a buzz on internet after Microsoft announced new Windows 11 and apparently lots of PCs will be unable to upgrade due to “incompatible hardware” or not meeting the Windows 11 requirements. This will probably change due to backlash but one of those requirements is Trusted Platform Module (TPM) 2.0, (or some say 1.2).

To check what version of TPM you have simply click on the windows search icon (or press Win-R to open run console) and type tpm.msc and press enter.

New windows will open, called Trusted Platform (TPM) Module Management. Check if TPM is ready for use and what version of TPM do you have. If you have 2.0 then this requirement is met.

Trusted Platform Module (TPM) 2.0 Management

Microsoft had an PC Health Check app to tell you if your PC meets requirements but they puilled it to update it.

CSS files not refreshing on – wordpress / siteground

If you have siteground hosting (could be the same for other hosts) and maybe WordPress site and you just edited a style.css file, reloaded your page but you cant see the changes (they appear after some time) then it is probably a Super Cacher issue.

Go to your siteground cpanel, find SuperCacher under Site Improvement Tools and click it.

Then find your domain, click Flush Cache then turn it Off.

Here is some more info:
The Static Cache option caches all static content on your account that includes images, CSS files, javascript, flash, and more. Once enabled, all requests of future visitors to your pages will be answered from the cached content and not directly from the server. If you just made changes to your website and want to see them live immediately, you could use the flush button to purge the cache on your account and not wait for the automatic server flush that happens over periods of a few hours.

So one approach you could use is this : turn off cache while you are editing the files (through FTP, not in wordpress admin) site. Once you are done just turn it on again.

Unity Corgi Engine PixelPerfectCamera.cs error

I bought the latest Corgi Engine Package and tried to import it using latest version of Unity: 2019.3.2f1

After package was imported successfully I was unable to run some demoes because I got these errors:

Library\PackageCache\com.unity.2d.pixel-perfect@1.0.1-preview\Runtime\PixelPerfectCamera.cs(168,13): error CS0234: The type or namespace name ‘PixelPerfectRendering’ does not exist in the namespace ‘UnityEngine.Experimental.U2D’ (are you missing an assembly reference?)

Library\PackageCache\com.unity.2d.pixel-perfect@1.0.1-preview\Runtime\PixelPerfectCamera.cs(173,13): error CS0234: The type or namespace name ‘PixelPerfectRendering’ does not exist in the namespace ‘UnityEngine.Experimental.U2D’ (are you missing an assembly reference?)

Luckily, the problem is not with Corgi Engine but Unity – you need to update the PixelPerfectCamera package.

Go to (menu) : Window->package manager in menu and update the PixelPerfectCamera package.

2D pixel package update

This will fix the fatal errors.

Unity Fatal Error: dataOffset !=file.GetPosition()

I was importing a package from Unity store and got this error:

Fatal Error:
dataOffset !=file.GetPosition()

There are probably many reasons why this error can appear but the first thing you should do is check if there is insufficient space on your computer’s hard disk (the one where you keep your projects and also the one where you keep Unity – if they are not on the same disk). I got this error wile importing very large assets package from the Asset Store Window.

So, delete some files (that you do not need anymore) from hard drive and you should be fine.

If you need to to see what makes your disk full, you can use TreeSize Free tool.


WordPress Custom Fields missing in admin (post or page)

This is a very specific problem so it might only work for some. After I updated WordPress and all plugins on an old site that used WordPress Custom Fields to enter some data, the Custom Fields in admin disappeared. I could add a new post but Custom Fields were nowhere to be sen, not even in the screen options.

Long story short, after doing some searching on the net, I found out it was ACF (Advanced Custom Fields) fault. In new version of the plugin they disable WordPress Custom Fields because they think you are using ACF anyway so no need for both. Not sure I agree but here is 2 ways you can try to solve it:

  1. If you activated ACF but are not using the plugin, just disable it.  WordPress Custom Fields should come back.
  2. If you want to keep both then add this code to your theme’s function.php file (the best is the child theme, if you have one)
    add_filter('acf/settings/remove_wp_meta_box', '__return_false');

WordPress Custom Fields should reappear now.

Using Laragon for Laravel projects

I am in the process of migrating one of my sites from Codeigniter (anyone remember it? It promised so much but then fell behind, especially when Laravel came out years ago) to Laravel. It’s been a while since I used Laravel but I always love developing with it.

I always use XAMPP for local development but luckily I googled for alternatives and found Laragon. What an awesome find. At first I thought it was just for Laravel, due to name Laragon but you can use it for everything.

So here is how easy it was to install latest Laravel and start local development.

  1.  Go to Laragon website and download it, full or lite. Install (also select development folder) and start the services. Now you have a running web server!I changed few preferences (I don’t want it to start with Windows but I want it to start minimized and start ALL services at once) but you can do whatever is best for you.Another great thing: It comes with my favorite Console Emulator CMDER (not my screenshot):
  2. Let’s install Laravel. Right click blue (or green) Laragon tray Icon -> Quick App -> Laravel, name the project (folder)  and Laragon will begin to install Laravel via console. If you get asked for admin permission to open console (for hosts if I remember correctly) say yes.   When it finishes you should be able to open the web at ProjectName.test . I have to say that the first time I installed Laravel the scripts in console did not finish so it didnt work. I deleted the project folder, restarted the step  2. again and then it worked – Laravel was installed!
    laragon install laravel
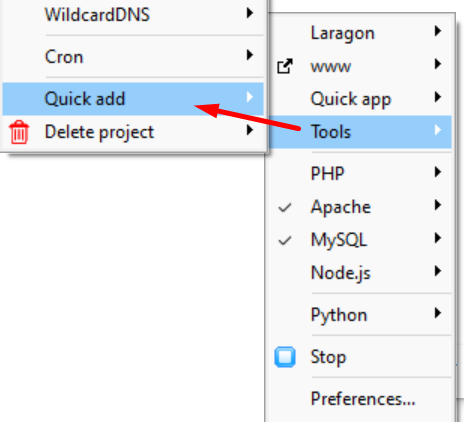
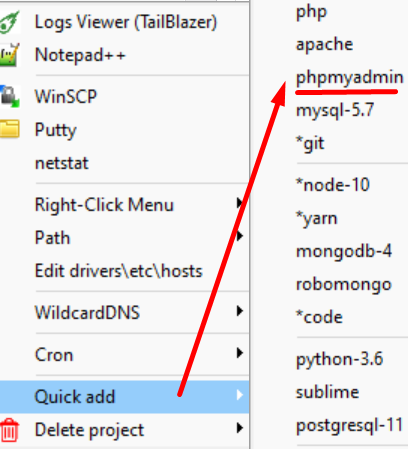
  3.  I noticed that phpmyadmin was not installed. It is super easy again to install it :  Right click blue (or green) Laragon Icon -> Tools -> Quick Add -> *phpmyadmin . Wait few moment and you can access it at localhost/phpmyadmin/

And that is all. I installed local web server, Laravel and phpmyadmin with few clicks.